Sorting in Excel is one of the most frequently used commands for data analysis. When handling a large amount of data, sorting makes the data set easier to comprehend by organizing the data in specific, designated ways.
Excel allows users to sort both text and numbers in ascending order, descending order, alphabetical order as well as by oldest to newest and color. It is designed to be a simple tool to organize and prepare the data for further analysis.
Let's take a look at how to sort in Excel, from the absolute basics to multi-level sorting and some helpful hacks.
How to sort in Excel: the basics
Depending on how the data set is being organized, users can apply sorting to the entire spreadsheet or a specific range of cells.
Download your free practice file
Use this free Excel file to practice sorting along with the tutorial.
1. To sort the entire spreadsheet
To sort the entire spreadsheet, the data is always organized by a specific column. When sorting is applied, the corresponding information in the row moves up or down accordingly.
There’s also only one set of data available in the designed spreadsheet. In the example below, we will sort these city names alphabetically, from A to Z.
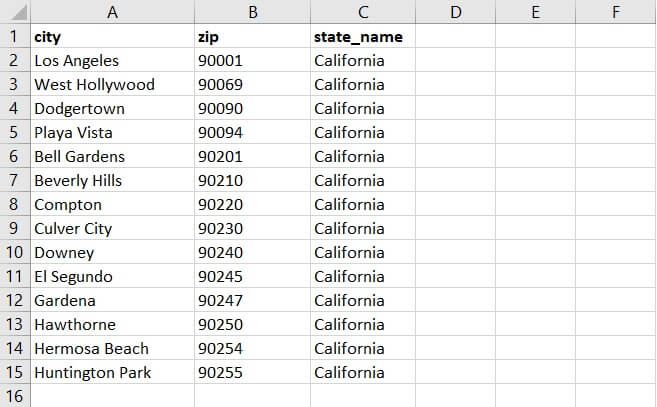
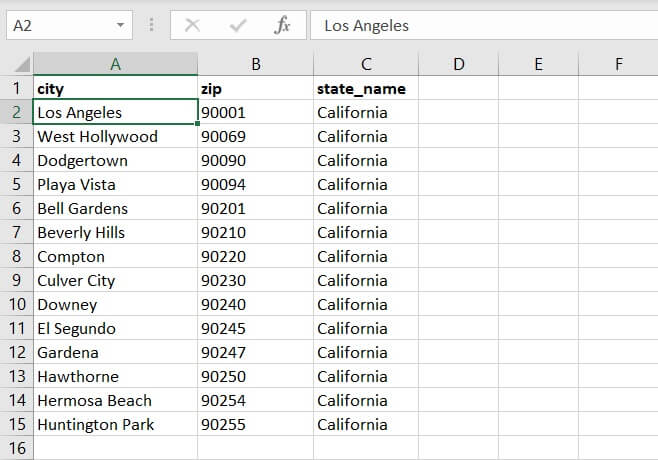
- Click on any city name under column A. In this demonstration, it’s A2 (Los Angeles).
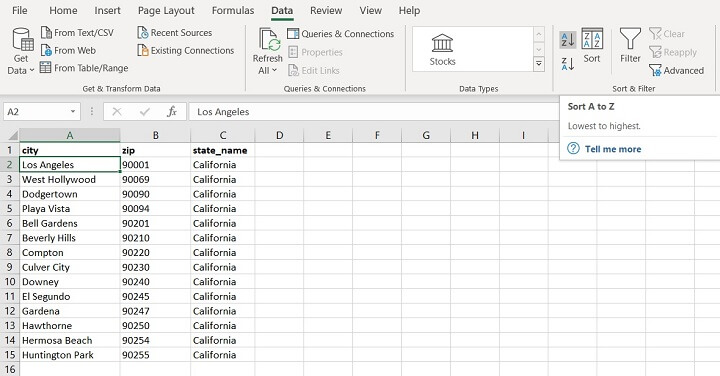
- Under Data on the ribbon, click the Sort A to Z command to sort the city names alphabetically from A to Z.
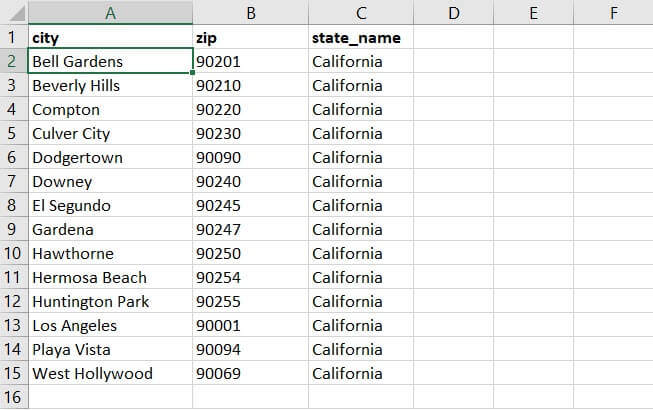
2. To sort a specific range of cells
Often a specific range of cells is selected for sorting as there are other sets of data available in the same spreadsheet, or only a specific part of data is required in the analysis. It helps to avoid mixing up the information by specifying the size of the data set.
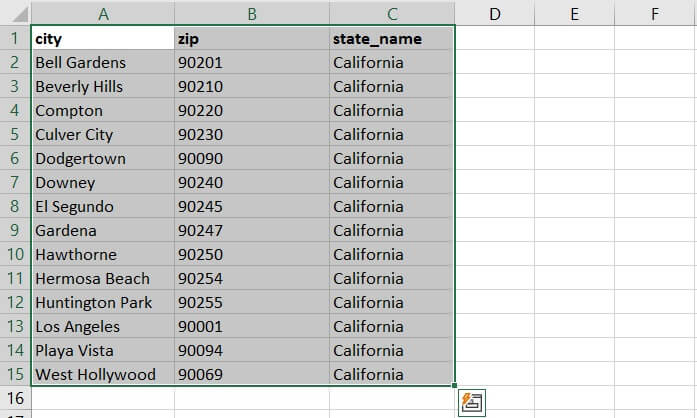
Using the same set of data above, this time, we want to sort the data based on zip code but specifying the range of cells.
- Begin by selecting the range of cells. In this example, it’s A1:C15.
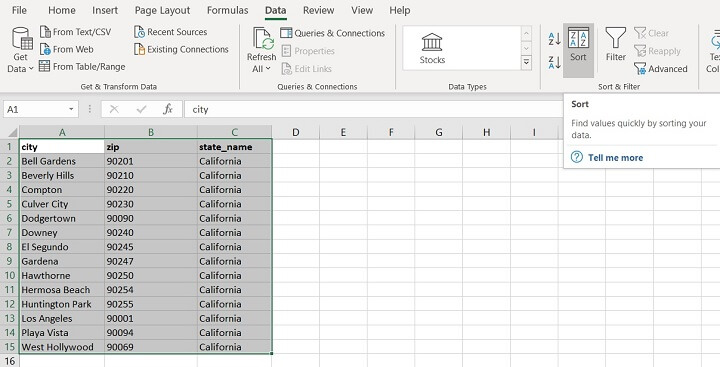
- Under Data on the ribbon, click the Sort command.

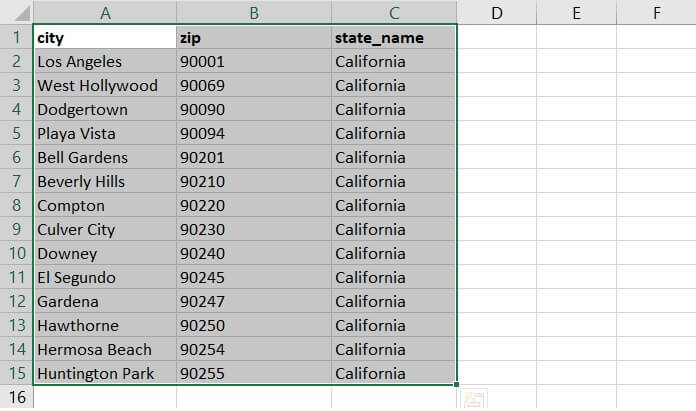
Multi level sorting in Excel
In most scenarios, sorting data by one column serves the purpose. However, when handling a large database, it’s common to organize and sort the data on multiple levels based on priorities.
There are two ways to do multi level sorting — by using the dialogue box or the A-Z/Z-A Sort icons. The former option involves a few more steps but gives considerably more precise results. The latter is a quick shortcut to multi level sorting and might result in errors sometimes.
1. By using dialogue box
In the example, say we want to sort the first name alphabetically from A to Z and their age from smallest to largest.
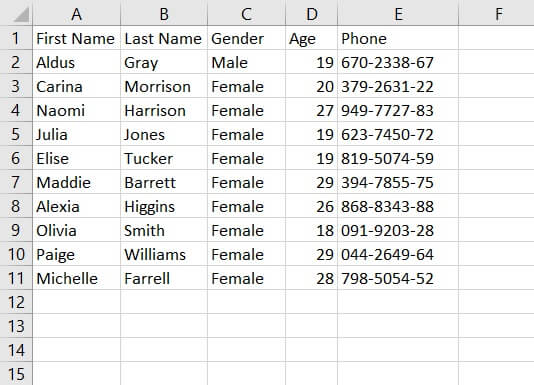
- Begin by selecting the data range (A1:E11).
- Click on the Sort icon under Data in the ribbon, and then the sort dialogue box will appear.
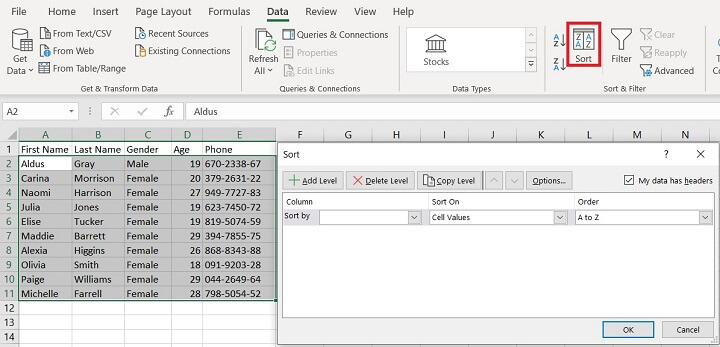
- 1st level: to sort the first names alphabetically, from A to Z
- 2nd level: to sort the ages from smallest to largest
To apply the 1st level, select the options below accordingly:
- Sort by: First Name
- Sort On: Cell Values
- Order: A to Z


- Sort by: Age
- Sort On: Cell Values
- Order: Smallest to Largest.
Then, click Ok. 
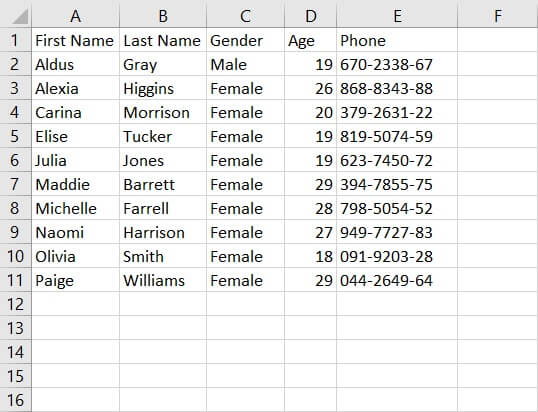
Note: If users choose to sort by Age (smallest to largest) then First Name (A to Z) the data will look completely different. It’s important to identify the priorities prior to selecting the first column to sort.
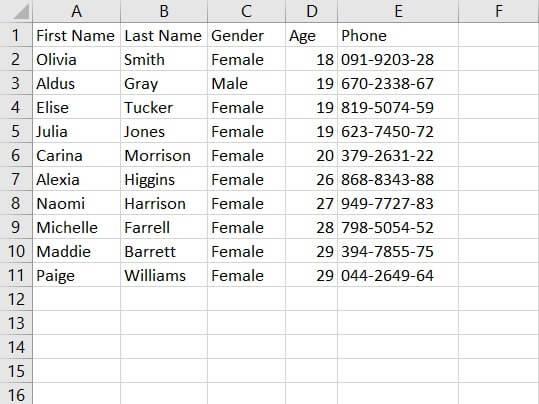

2. By using A-Z/Z-A Sort icons
Using the same sample data set, we aim to sort the first name alphabetically from A to Z and their age from smallest to largest. However, the A-Z/Z-A Sort icons work a bit differently than the dialogue box. Users will need to sort the second level first, then the first level.
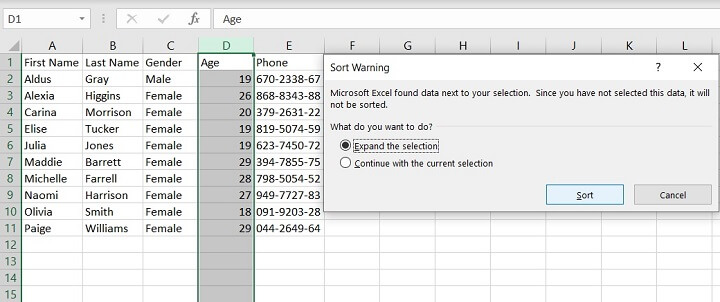
- Begin by selecting the column of the 2nd level — Column D (Age in this case).
- Click on the A to Z icon on the Data tab.
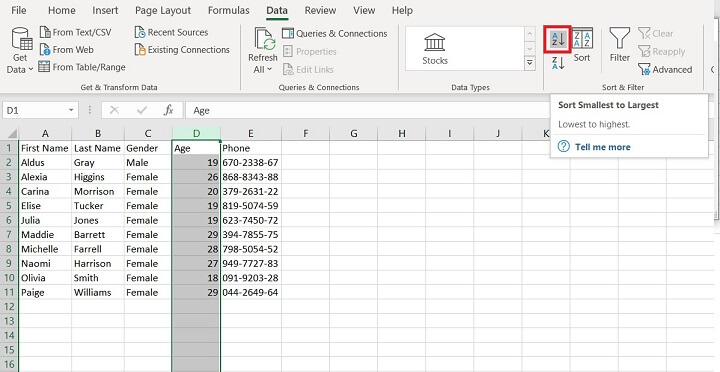
- A sort warning will appear. Select Expand the selection to ensure that the full data set is sorted as well.
- Click Sort.
- Now, to sort the first name, repeat the same steps above. Select Column A (First Name). Then click the Sort A to Z icon. Choose to expand the selection.
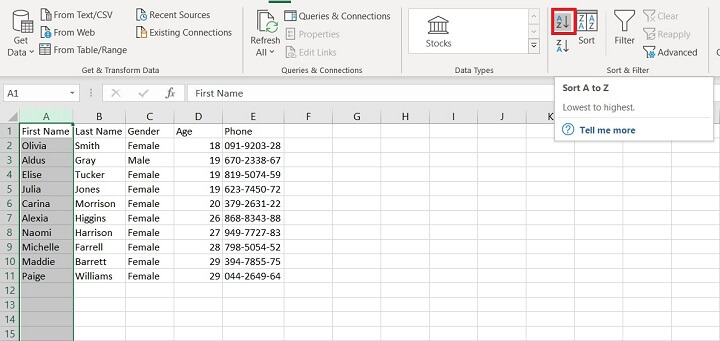
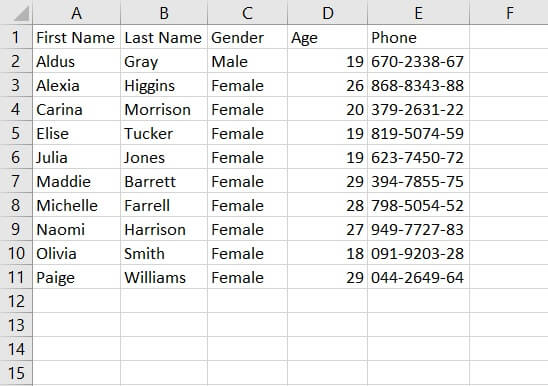
Note: Though both ways give the same results, it’s recommended to sort using the dialogue box as it presents a clear picture of the levels being sorted and in what orders. The Sort icon works best in situations where the data set is relatively simpler and smaller in scale with a few columns.
How to sort in custom order
In some cases, the default sorting options in Excel are not able to sort the data in the desired order. When that happens, set up a custom sort that accommodates your own sorting needs.
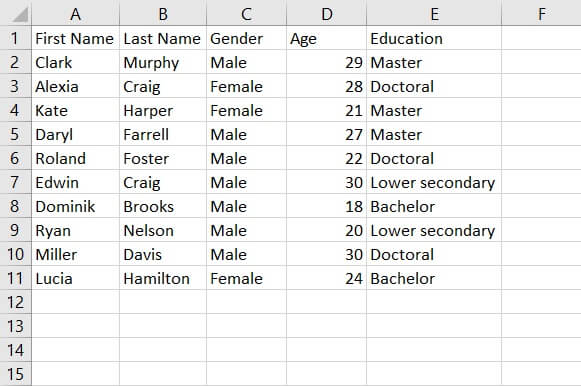
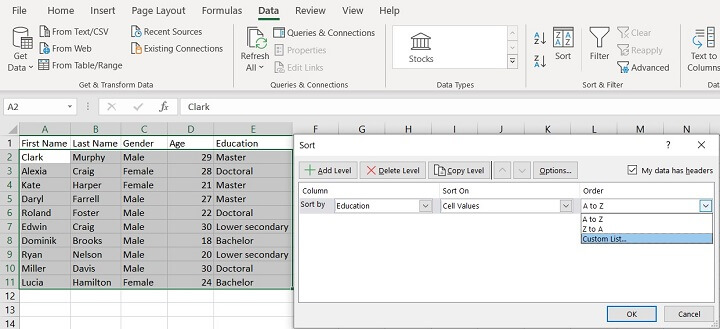
In the example below, we are required to sort the employees’ education level from highest to lowest.
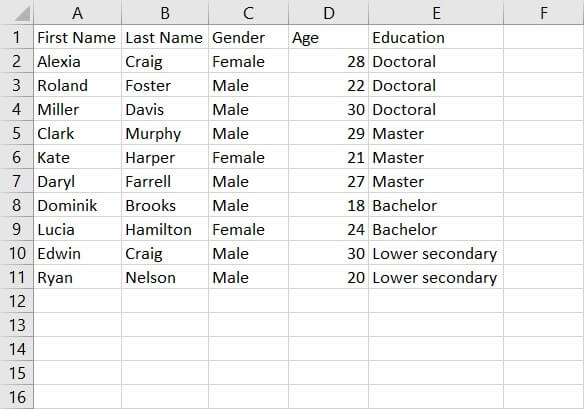
If we sort the column alphabetically (from A to Z or from Z to A) the order will not be correct. The correct order should be Doctoral, Master, Bachelor, and Lower secondary. So, to sort in the order we want, we’ll need to create a custom sort to tackle this scenario.
- Begin by selecting the data set.
- Click the Sort icon to access the sort dialogue box.
- Select Custom List under Order.
- Click Ok.
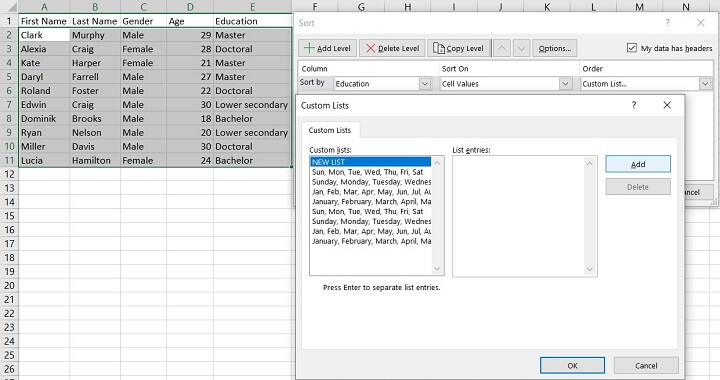
- Click NEW LIST under the Custom lists box, and manually enter the desired order under list entries: Doctoral, Master, Bachelor, and Lower secondary. Press Enter to separate list entries.
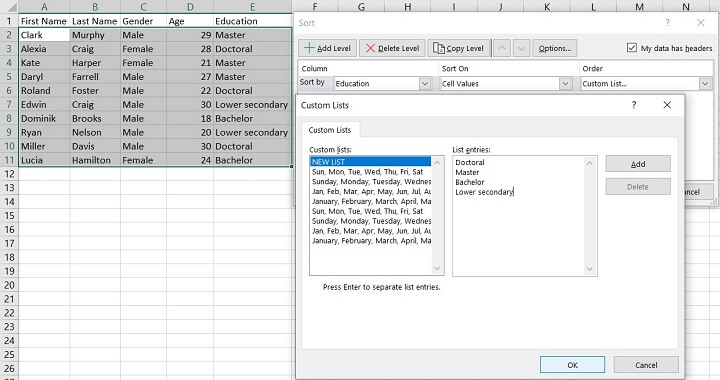
- Click Ok to proceed. The new custom order is now available as a sorting order.
- Select the desired order, and click Ok.

How to sort rows in Excel
The examples above illustrate how to sort data by columns. However, for some data sets, where data is organized by row, it is necessary to sort data by row.
The example below illustrates the year-round climate data of Texas. We can sort rows so that the month with the highest average high in Fahrenheit is on the left. 
- Same as sorting columns, start by selecting the range of cells (A1:M4).
- Click the Sort icon under Data to access the sort dialogue box.
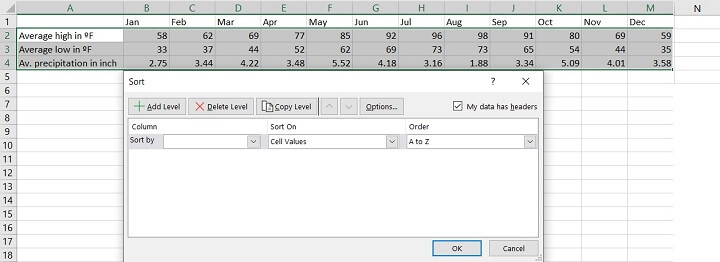
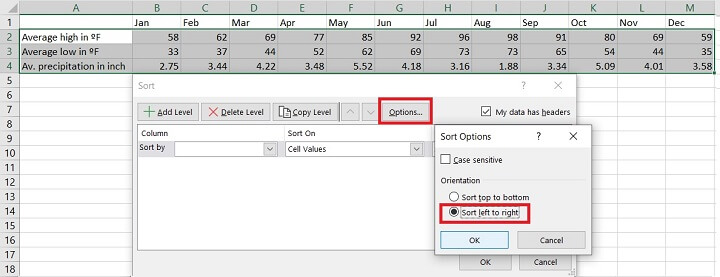
- Click Options. The Sort Options dialogue will appear.
- Select Sort left to right to opt for sorting row
- Click Ok to proceed.
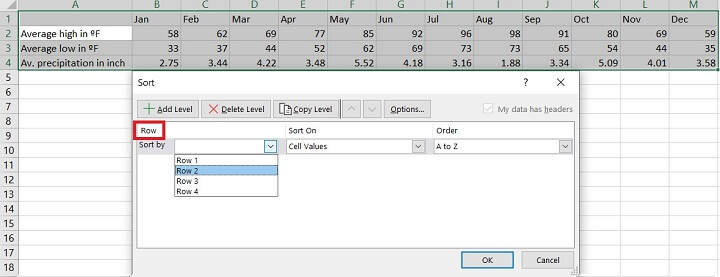
- Select Row 2 under Sort by. Row 2 represents the data for the average high in Fahrenheit.
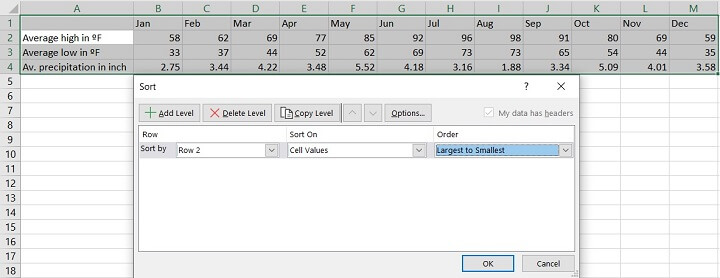
- Under Order, select Largest to Smallest, then click Ok.

Challenge me!
 |
Test your advanced sorting skills with this FREE Excel challenge! |
How to sort by cell icon
Sometimes, cell icons are added to the data set to enhance the results. Excel allows sorting by cell icons in addition to sorting by alphabetical order, ascending order, descending order, or custom order.
There are two ways to do it, either by using the sort dialogue box or by using the dropdown list.
1. Sort by cell icon with the sort dialogue box
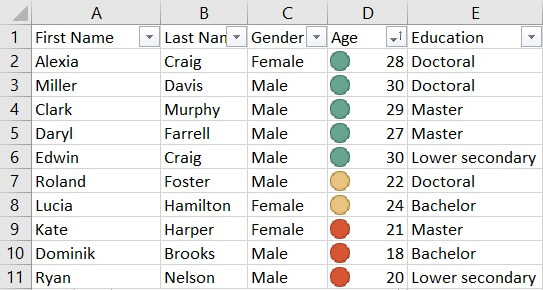
In the example below, we will sort the cell icons under Age based on the color, with yellow on top.
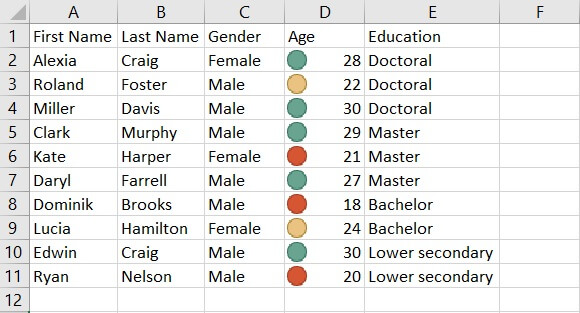
- To begin, select the range of cells and click the Sort icon under the Data tab. The sort dialogue box will appear.
- Under Order, select Yellow, On Top. Click Ok.

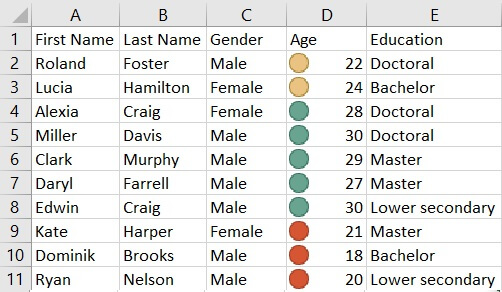
2. Sort by using dropdown list.
- Create a dropdown list by adding a filter under each column.
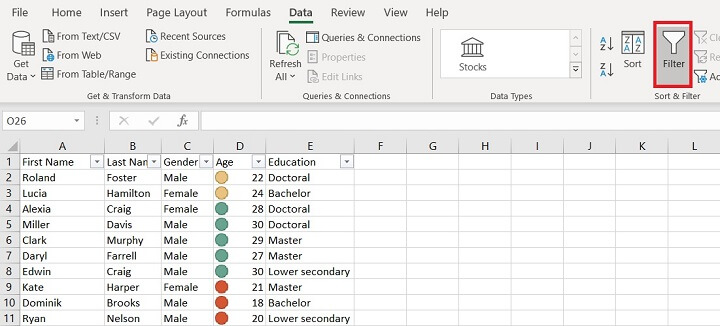
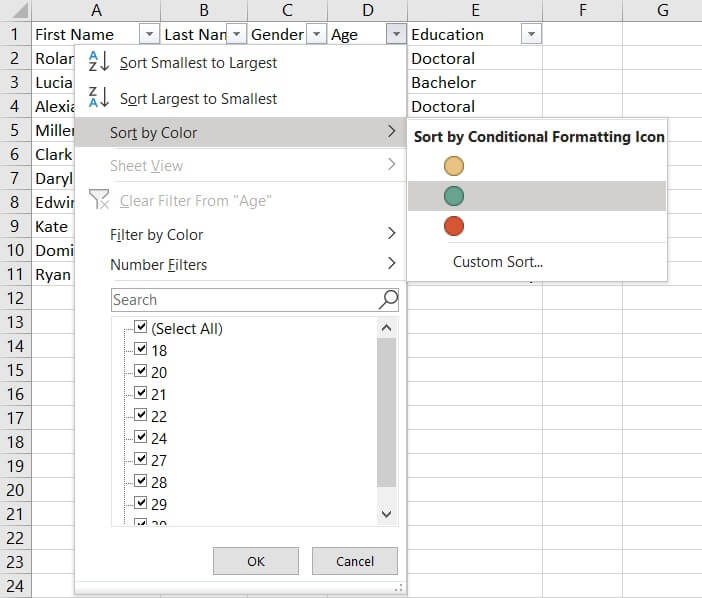
- Click the arrow to access the dropdown list.
- Select Sort by Color and select the desired color to be on top (green in this example).
Problems with sorting in Excel
As handy as sorting seems to be, sometimes the data can’t be sorted properly due to some of the possible scenarios below.
1. Hidden rows or columns
Excel can’t sort hidden rows or columns. They will remain in the same cells regardless of the sorting order.
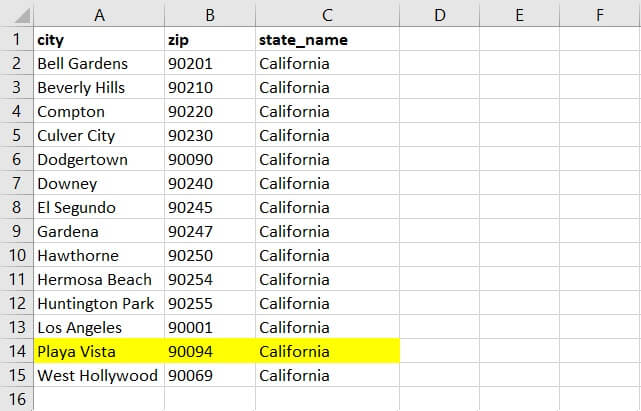
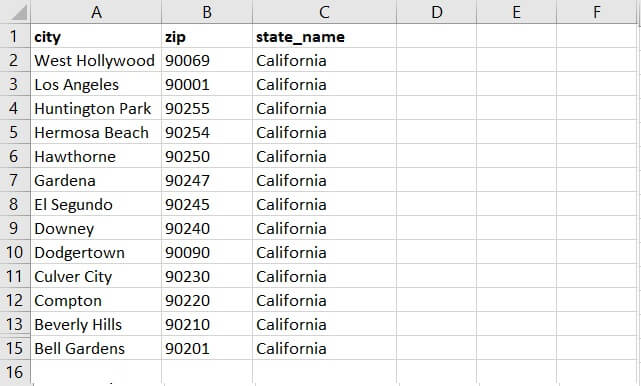
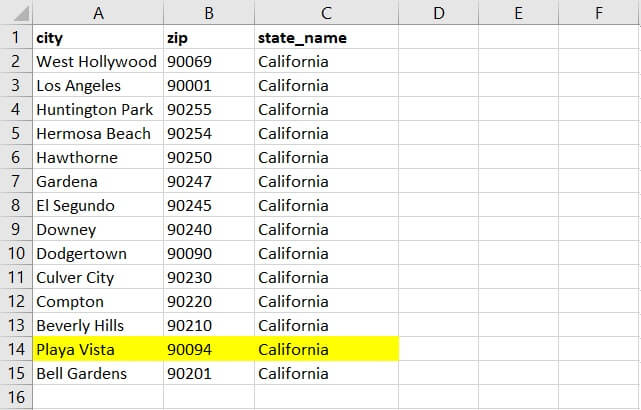
For example, if row 14 is hidden, when we sort the city names from Z to A, all other city names will reshuffle their order, except row 14.
2. Data inconsistency
Excel can sort data of the same type only. Sometimes, a number could actually be text. When that happens, Excel cannot sort properly.
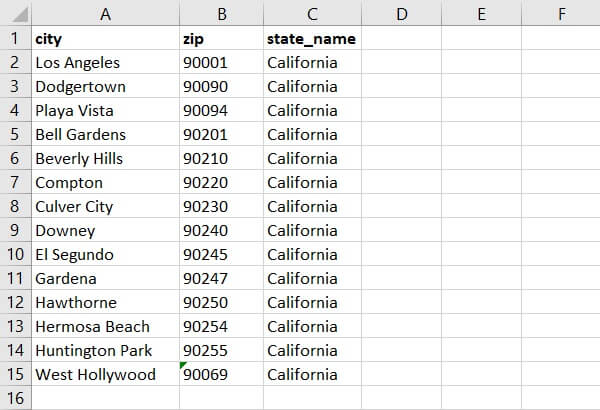
In the example below, “90069” is actually a text. So when performing a sort from smallest to largest, “90069” is at the bottom as it’s not recognized as a number.
Before performing any sorting on numbers, examine the data type, and convert the column to text if necessary.
3. Multirow header
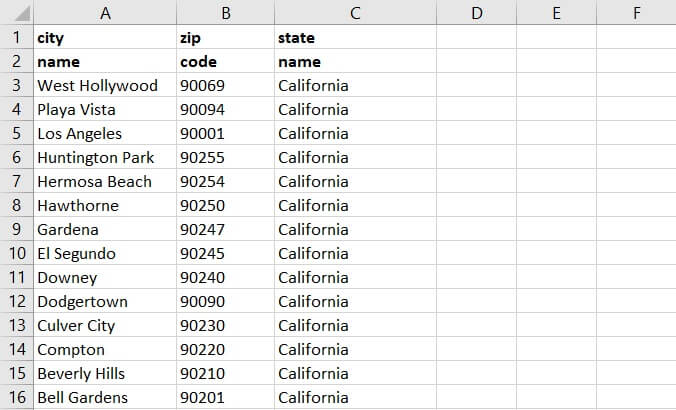
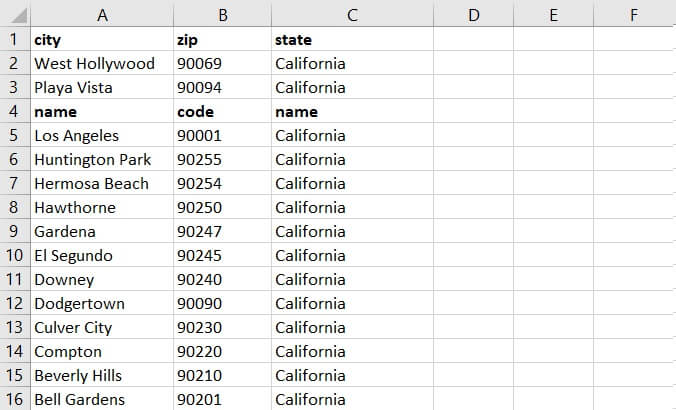
Sorting in Excel works only when the header is in a single row only. If there’s a multi header like below, Excel will sort the second header as a part of the data set.
To avoid this, manually select the range of cells you want to be sorted as described in our basics section above.
The data set below has multirow headers.
Summary
We hope this resource was helpful in learning how to sort in Excel! Sorting is a great tool to organize vast amounts of data in many different ways.
Data can be sorted alphabetically from A to Z or from Z to A. It can be sorted numerically from smallest to largest or from largest to smallest as well as with cell icons and custom orders.
However, to ensure an accurate sort, review the data to make sure that there are no hidden rows or columns, that the data type is consistent, and that there is no multirow header.
To learn more about sorting, filtering, and other tools and techniques to work with your data, try our Excel - Basic and Advanced course now. You can also try our free Excel in an Hour course to cover some basics in Excel.
Learn Excel for free
Start learning formulas, functions, and time-saving hacks today with this free course!
Start free course


