
Here’s how to create a project management plan, even if you have zero experience doing so.
Whether you’re a newly hired project manager or one who’s been slaying the game for years, having the right plan in place is essential to the success of your project. After all, when you have everything outlined and neatly organized, you’ll score a much better chance of managing a project that runs smoothly from start to finish.
Bad news: It’s this step, actually creating the plan, that trips many managers up. Fortunately, with the help of today’s article, you won’t fall into that trap. I’ll show you everything you need to know about how to create a project management plan so you have a roadmap to run with.
We’ll cover how to:
- Step 1: Identify the goal of the project
- Step 2: Map out the scope
- Step 3: Develop an outline or plan
- Step 4: Share this initial idea with your team
- Step 5: Finalize your plan
- Step 6: Use a Gantt chart to keep things organized
- Step 7: Distribute your project management plan
- Step 8: Hold a project post mortem
So let’s jump right in.
Want to learn more?
Take your project management skills to the next level with our comprehensive (and free) ebook!
How to create a project management plan
Follow these eight steps to build a solid project management plan from the ground up:
Step 1: Identify the goal of the project
To build anything of substance, the first step you’ll want to tackle is creating the right foundation.
Ask yourself these questions to lay the groundwork:
- Why are you creating this project?
- What’s the goal of it?
- How will this affect your stakeholders?
- What about your team?
And to help you answer those, make sure you do the following:
Research and homework
- You may already have a good idea of why you’re creating this project, but it’s essential to back this up with research.
- How is your company doing things right now? What’s working? What doesn’t work?
- Are there enough resources available? What else is needed?
- Figure out the real the problem at hand and gain a deep understanding of the current mechanics before you try to improve them.
Meet with your team for feedback
- Meet with anyone who could be involved in this project during this stage. Before narrowing things down, be sure to speak with any employees who will be involved in this project.
- You need to see things from their perspective so you have all your ducks in a row when it comes time to introduce the plan to your stakeholders.
- Once that’s taken care of, you can then meet your stakeholders with confidence.
Figure out who is a stakeholder
- Sure, you may have a Board of Directors or some other stakeholders involved, but don’t forget, those aren’t the only people to consider.
- Your customers and employees may also be stakeholders in this project.
- In short, anyone who could be affected by these changes is a stakeholder and must be considered as such.
- After you nail down your “why” and meet with both your team and all prominent stakeholders, you’re ready to set your priorities and goals.
Identify priorities
- Before you dive into your goals, consider your priorities first. What is more important here? What can take a backseat?
- Identify your priorities before moving on to finalizing your goals.
Set clear goals
- Once you’ve tackled all of that, you’re ready to set specific, measurable goals.
- These goals serve as the foundation of your project management plan so it’s crucial that you spend enough time figuring them out before moving on to the rest of our steps.
You’ll need to answer:
- What are you hoping to achieve here?
- How will you measure that?
- What’s considered a success?
With that important information nailed down, you can then map out your project’s scope.
Step 2: Map out the scope

If you were to compare your project management plan to building a house, your first step is the concrete foundation.
This next step is the blueprint for how things will get done and what your project will look like once it’s in motion.
So answer these next questions before proceeding:
What is your budget?
- Before you create an elaborate project scope that’s out of reach, you need to consider your budget first. And I’m not only referring to your financial investment here.
- You must also take into account your other valuable resources, such as time and manpower. How much of these can you afford to use?
- Outline your budget in terms of financial investment, time, and resources needed. Only then will you be able to create a realistic project scope, which is also your next step.
What is your project scope?
- As with setting goals, it’s important to stretch your project to the right limits. You don’t want to go so far that your team can’t reach its targets, yet you also don’t want to create a project that doesn’t accomplish much.
- To help strike the right balance, create a project scope that is crystal clear and outlines all of the details — both big and small.
- Your project scope should also include your deliverables and the deliverable schedule.
- For more on keeping your project's scope within bounds, check out our definitive guide to scope creep.
What are your deliverables?
- Everyone on your team should know what needs to be delivered and when. By spelling this out in your project scope, you’ll do just that.
- Not only does this deliverables list create a workflow everyone can follow, it also helps keep everyone on track.
- You’ll also show stakeholders or clients what they can expect, which naturally builds accountability into your project management plan.
- So when you account for all the deliverables you’re responsible for, your next task is to plot out your deliverable schedule.
What is your deliverable schedule?
- It’s crucial that you don’t overpromise during this step. Do that and your team will be left scrambling throughout the project and your deliverables will suffer in quality.
- A better approach is to use the research you conducted in step 1 to hone in on a realistic delivery schedule.
- If your research uncovered that the task takes 2 weeks to complete, it’s not a good idea to only give your team a few days and hope everything somehow falls into place within a shorter time frame.
- It’s also smart to add a buffer to any areas you’re not sure of, just to be safe. This gives your project and your team the breathing room needed to get the job done correctly.
- If you’re worried that your stakeholders will be concerned about the amount of time needed, reassure them that to do the job right the first time, it needs to take that much time. Otherwise you’ll be stuck re-working things for months to come.
- Now that you have all of this sketched out, you’re ready to create the first draft of your project plan.
Step 3: Develop an outline or plan
Your next step is to create an outline and plan of action based on everything you’ve learned so far.
While this is only a first draft at this point, it pays to finalize as much as you can (as if it were the real thing) so you can avoid multiple rounds of revisions.
In this outline, include the project’s:
- “Why”
- Goals
- Stakeholders
- Budget
- Scope
- Deliverables
- Deliverable schedule
You should also include a page about your research to highlight your biggest key findings and discuss how they inspired your project management plan.
Polish up your document, add some branding elements, and you’ll be ready to share it with your team.
Step 4: Share this initial idea with your team
Before you get too excited and send your document to every one of your stakeholders, you need to finalize it with your team beforehand.
This step is one that many project managers overlook for time’s sake — and it’s a crucial and costly mistake.
When there’s a disconnect between the initial plan and how the work is implemented, you’re going to face several snags along the way.
You’re better off finalizing this draft plan with your team before it gets to the approval stage.
This ensures that your project will run as smoothly as your dreams.
So in this stage, hold a kickoff meeting to:
- Explain the ins and outs of the project
- Let your team know what’s expected of them and when
- Work out any kinks that may come up
It’s especially important to pay attention to that last point.
No matter how hard you try to cover all of your bases, hiccups will inevitably surface in any project.
But with proper planning, you’ll minimize problems as much as humanly possible. I’ll touch more on this next.
Step 5: Finalize your plan
Using the feedback from your team, you’re ready to finalize your plan.
This official plan will be the one you’ll send to stakeholders so it’s important to take your time here.
You should also add a section about any issues that may come up, including how you plan to handle them.
While it may seem counterintuitive to highlight possible hiccups to your stakeholders, you’ll be showing them that you’re taking a proactive, instead of reactive, approach. This foresight is always appreciated.
It’s also ideal to assign roles during this phase of the project plan so stakeholders know how to get in touch with your points of contact during each step.
The best way to display this type of information, both internally and externally for stakeholders, is through a Gantt chart.
Step 6: Use a Gantt chart to keep things organized
If you have Excel, you can use this free Gantt Chart template to create a timeline of deliverables.
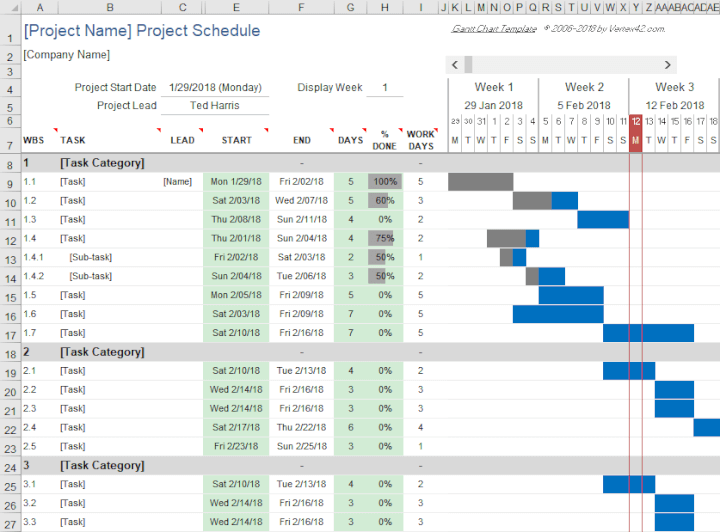
This helpful tracker ensures that both your team and stakeholders know what to expect and when.
As the project unfolds, keep this updated throughout the day so anyone can see where your project presently stands.
Once you’ve finished creating your project management plan and created a timeline using a Gantt chart, you can finally share your plan with everyone.
Step 7: Distribute your project management plan
When your plan is ready to send out to stakeholders and everyone else on your team, you’ll be able to answer questions and start putting your plan into motion.
To stay on track, plot out the big milestones first and then how you plan to achieve each one using smaller targets, such as daily, weekly, or monthly goals.
After that, you’re simply managing deliverables and your team. Easy peasy.
Now, before you use this template again on your next project, conduct a project post mortem as I’ll show you next.
Step 8: Hold a project post mortem
This is similar to a kickoff meeting except that it happens after a project has finished.
I spoke in depth about the topic in this guide so I’ll keep things brief here. If you need more help, check out that guide when you’re done reading this one.
With a project post mortem, your goal is to find out how your project went from start to finish, including any bumps in the road you experienced.
- Did you run on schedule?
- If there were any milestones missed, what caused the delay? Can that be prevented for the next one?
- Are there any other issues you ran into?
You should also compare how your results fared with your initial plan.
By taking this time to reflect, you’ll all but guarantee that your next project doesn’t fall victim to the same mistakes.
You also want to highlight what went well and give your team the kudos they deserve for a job well done.
This will help keep the positive momentum moving right into your next project.
Jot down everything you discover here so you can use this intel to improve your next project management plan.
Create your project management plan now
Don’t let the thought of creating a project management plan from scratch stress you out.
Follow these 8 steps and you’ll have everything you need to make your project a success starting today!
Want to brush up on your project management skills? Check out the Project Management Basics and Project Management for Team Members courses to get a solid foundation in how to better manage your projects.