
Chances are you’ve done the same Excel tasks more than once: highlighting rows, pulling information from a list, or preparing reports.
What if you could handle all that with just a couple of clicks?
That’s where Excel macros come in! Record a series of actions once, then replay them whenever you need to.
In this month’s GoSkills Excel Challenge, we’re putting macros to the test. Ready to give it a go?
Here’s how to get started:
- Watch the challenge video for a complete overview.
- Review the instructions below.
- Download the challenge workbook.
- Share your approach with our GoSkills Excel Slack community.
- Watch the solution video to compare your results.
Download the challenge workbook
Get the workbook with the challenge instructions and workspace for your solution.
The challenge 🧗
Imagine you’re organizing a monthly event. A fresh guest list lands in your inbox, complete with names, organizations, roles, table assignments, and dining choices.
But there’s a catch.
You need to identify all the board members and prepare a separate list showing where they’re seated and what they’re having for lunch.
You could go through the spreadsheet manually every month, but where’s the fun in that?
Your mission ✅
Your job is to automate the process using two Excel macros, so you can get the information you need without repeating the same steps each time.
1. Highlight all board members
Your first task is to record a macro that identifies every “board member” in the guest list and highlights their name.
Keep in mind that the Role column isn’t perfectly consistent. Your macro should recognize board members even when their roles contain extra spaces or different capitalization, like “BOARD MEMBER” or “ board member.” That’s the only role we’re looking for.
Once you’ve recorded the macro:
- Add a button to the worksheet to run it.
- Give your button a descriptive name.
- Test it on the second guest list provided in the workbook (List_2).
2. Create a board member summary
Next, the event caterer needs a handy summary, too!
Record a second macro that generates a list containing:
- Guest name: Each board member’s name.
- Table number: Their assigned table.
- Dining choice: Their selected meal.
The results should appear in the designated Board View area of your worksheet, starting in cell H7.
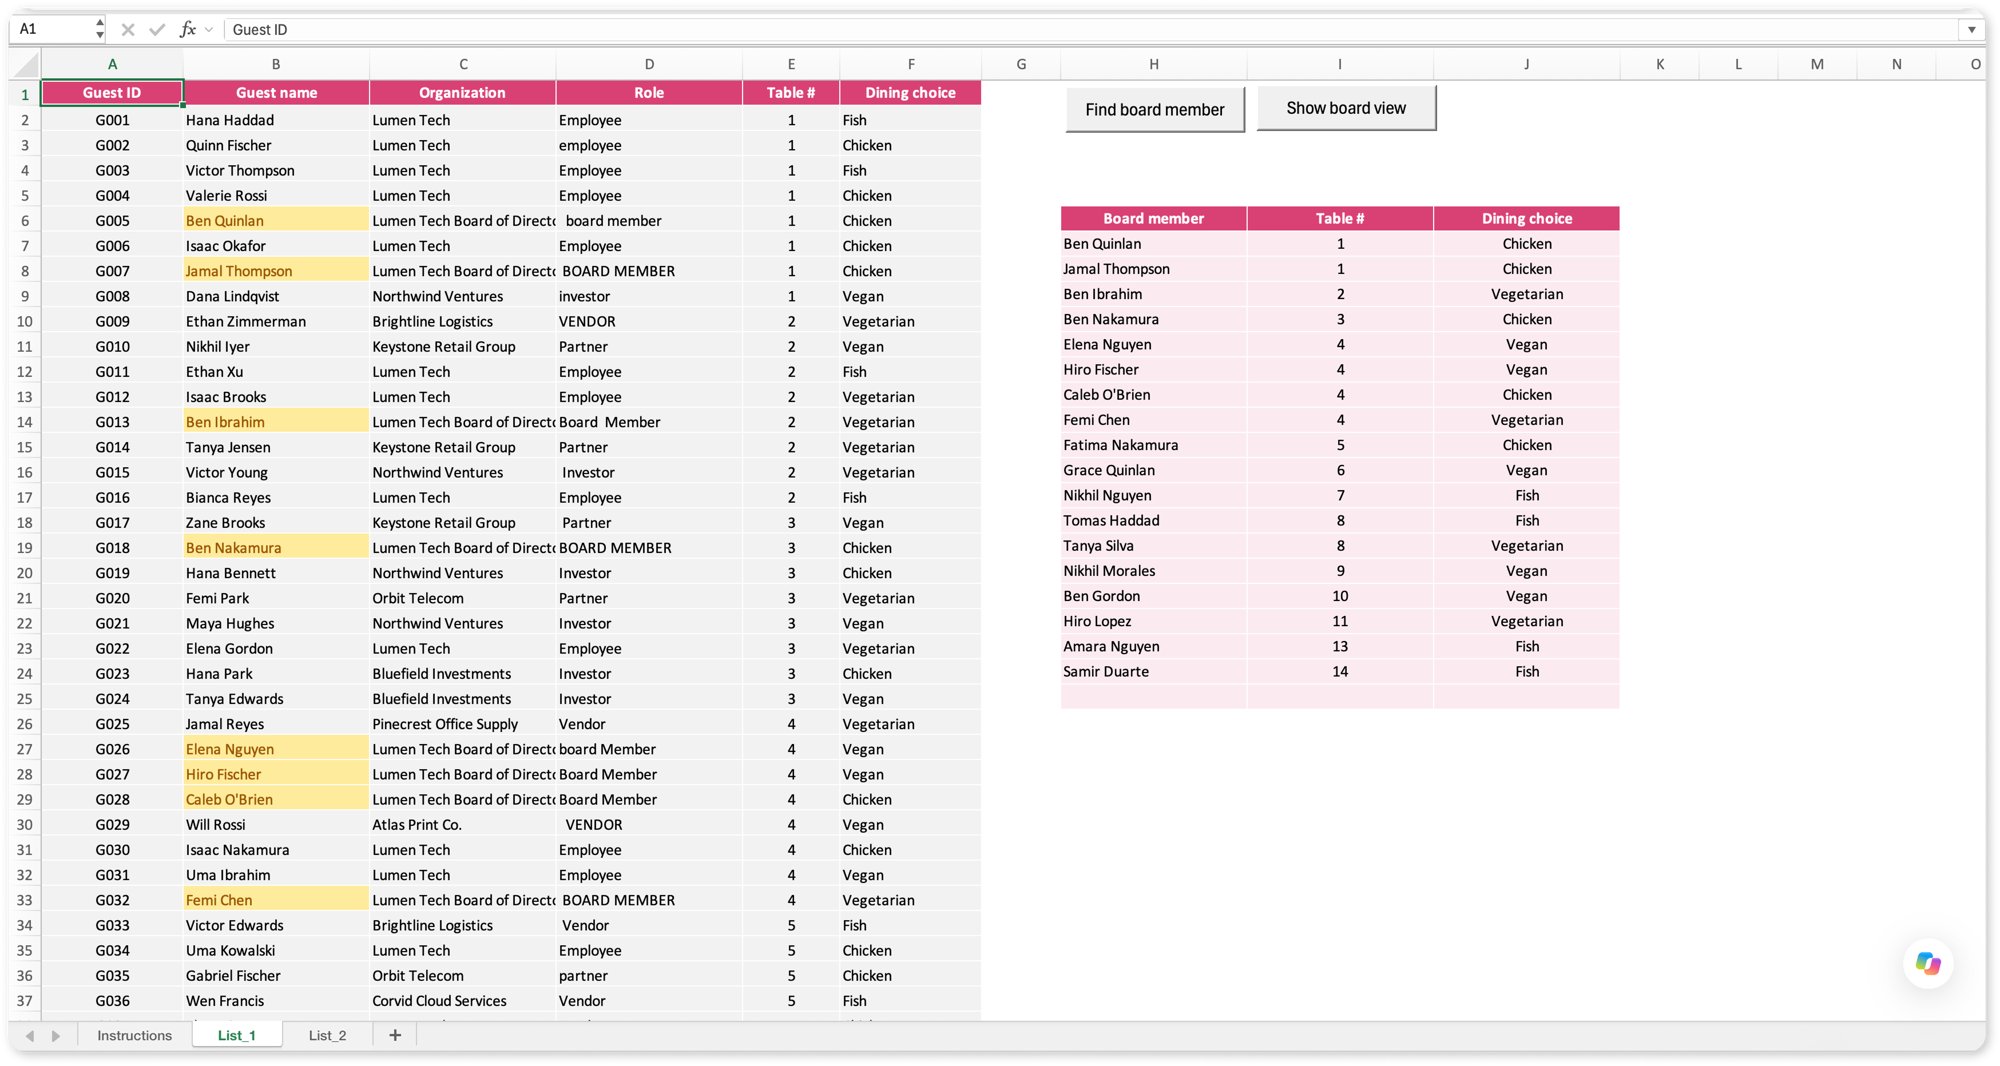
Just like in the first task, give this macro its own button and test it on List_2.
Here’s the real test: Can you make both macros work reliably on the new list, regardless of which cell is selected when you click the buttons?
The hint 💡
New to Excel macros? Don’t worry. You don’t need to be a programming expert to get started.
Excel’s built-in Macro Recorder is your best friend here. It captures your actions and turns them into instructions you can run again.
Our beginner’s guide to Excel macros walks you through the basics, including how to access the Developer tab, record a macro, and run it.
That’s all we’re giving away for now. 😉
A few concepts worth recapping 📚
1. Can Excel macros work with formulas and conditional formatting?
Absolutely! Excel macros can automate actions like applying conditional formatting rules and entering formulas into a worksheet.
That means you can combine Excel’s built-in features with macros to make tasks like highlighting data and generating summaries much easier.
2. What’s the difference between Excel macros and VBA?
Macros and VBA are closely related, but they’re not exactly the same thing.
A macro is the automation itself, while VBA (Visual Basic for Applications) is the programming language used to create it.
When you use Excel’s Macro Recorder, Excel automatically generates VBA code based on the actions you perform.
That means you can get started without writing code from scratch. You can also edit the recorded VBA code to make your macros more flexible.
3. Can you run an Excel macro with a button?
Yes! Excel allows you to assign a macro to a button on your worksheet.
Once the button is linked to your macro, clicking it runs the recorded instructions without requiring you to open the Macro dialog each time.
It’s a handy way to make your spreadsheet easier to use, especially when sharing it with others.
The solution ✅
How did you get on?
In our step-by-step solution, we walk through both macros, assign them to buttons, and put them to the test on a second guest list.
We’ll also explore what happens when a recorded macro doesn’t behave quite as expected, and how to troubleshoot it.
After all, a macro that works once isn’t necessarily ready for everyday use!
Did you try a different approach? We’d love to hear about it! Share your experience in the comments or join our GoSkills Excel Slack community to compare ideas with other Excel enthusiasts.
Keep practicing your Excel macro skills 🚀
Enjoyed this challenge? There’s plenty more where that came from!
For another hands-on exercise, check out Excel Challenge 10: Automating Repetitive Tasks With Macros. This time, you’ll practice using macros to automate chart creation with website analytics data.
And if you’re ready to take your automation skills further, explore our Microsoft Excel Macros and VBA course.
Led by Excel expert Ken Puls, the course covers everything from recording your first macro to editing VBA code, automating workflows, and troubleshooting common issues.
You can also browse our full library of free Excel Challenges for more practical exercises.
Keep experimenting, and see you in the next Excel Challenge! 👋

Join the Excel conversation on Slack
Ask a question or join the conversation regarding Excel challenges on our Slack channel.
Join Slack channel