
To streamline employee onboarding, many organizations rely on manual checklists. However, as company cultures evolve, these processes become outdated and ineffective, leaving new hires disengaged. That's why many companies now develop onboarding programs as elearning courses. Web-based onboarding lets HR teams monitor engagement and update their programs over time.
Our free employee onboarding template gives GoSkills users a headstart. Learn how it can transform your onboarding into an engaging, self-paced experience that ensures new hires succeed from day one.
Why use an elearning template?
Using an elearning template helps add structure to the onboarding process, which, at the best of times, can be overwhelming to newbies. According to SHRM, nearly one-third of all new hires quit their jobs within the first six months. The good news, according to the same article, is that new employees who went through a structured onboarding program were 58 percent more likely to be with the organization after three years. And when the onboarding process is standardized, organizations experience 50 percent more productivity from their new employees.
Obviously, a positive onboarding experience is a win-win. With a template, you can add unique organizational elements while giving new employees a feeling of empowerment as they integrate into the team using a guided, self-paced, step-by-step course. Importantly, they can return to the course material at any time to review training content that will become more relevant once they actually start performing on the job.
Employees who go through a structured onboarding program are 58% more likely to remain with the organization after three years.
- Source: Society for Human Resource Management
From the LMS dashboard and reports, the admin team can also monitor whether the new employee is hitting those crucial learning and integration milestones, especially if they are working remotely. Here’s how you can make the most of GoSkills’ onboarding course templates.
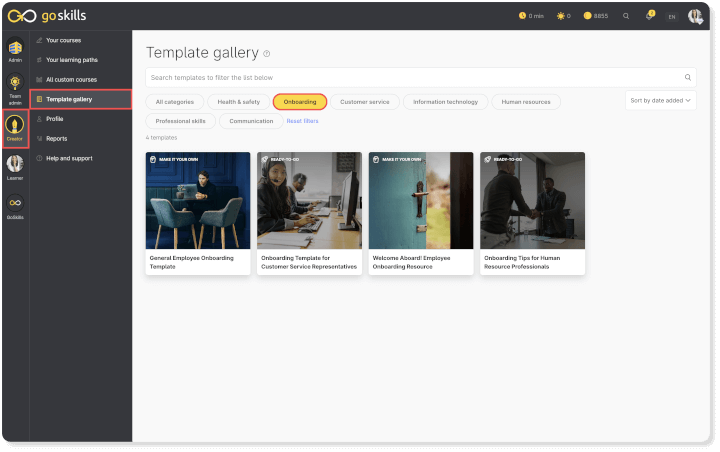
How to use the GoSkills course template gallery
- While you’re in Creator mode, click Template gallery.
- Browse through the course builder templates, or use the search tool to find the onboarding courses.
- Click the Use template button. This will create a new course in Edit mode. It will be saved as a draft until you publish it.
- Add, remove, or edit content blocks as you see fit. Important! 👉 Replace any placeholder text, such as [Company Name], [insert link], etc., throughout the course.
Enhance your onboarding content with AI
But what if you want to fine-tune the content even further? That’s where Genie comes in! Genie is GoSkills’ AI-powered content assistant, designed to help you refine and enhance your existing onboarding course effortlessly — or even create one from scratch.
Need to adjust the tone, simplify complex information, or make your course more engaging? Genie can instantly reword sections for clarity, suggest improvements based on best practices, and ensure your content is both informative and easy to digest.
Genie can also transform your existing company files — such as guidelines, manuals, or policies stored as PDFs or Word documents — into interactive training content. Simply upload your files, and Genie will help you turn them into an engaging, structured onboarding experience that sets your new hires up for success. Watch the video below to see it in action!
The most important step: Make it memorable!
Obviously, we think our template courses are already pretty awesome, but no one knows your organization the way you do. There might be particular ways of doing things that are unique to your company. Before you hit that Publish button, we encourage you to give your newbies a warm welcome with company images, videos, and resources that immerse them into your expectations and company culture from day one.Here are a few reminders and suggestions of things you might want to include:
👉Downloadable reference documents
- HR policy
- Non-disclosure agreement (NDA)
- Payroll schedule
👉To-do lists
- People to meet
- Meetings to attend
- Required training
👉Links to helpful resources
- Procedure manuals
- Organization chart and/or structure
- Performance evaluation policy
- Tools for work
Best practices before publishing your onboarding course
You’re almost there! We just want to share a few more tips to help you deliver a high-quality onboarding experience.
- Preview your course. Sure, you’ve added content that’s informative, engaging, and maybe even entertaining, but how does it flow? Go back to the opening page of your course and click the Play icon ▶ at the top of the page to see what your learners will see.
- Test videos and links. Make sure your hyperlinks go where you expect and your videos load and play correctly.
- Take the quizzes! Quizzes and tests play an essential role in knowledge retention. But they’re only effective if they are error-free and reinforce points that are worth remembering. So take the quizzes yourself, and experiment with what happens when you select some wrong answers.
- Add a review form. This step is completely optional but is highly recommended. It can be a bit scary to solicit feedback, but it really can be a gift. So get your learners to rate their experience by asking them what they liked and what could be improved.
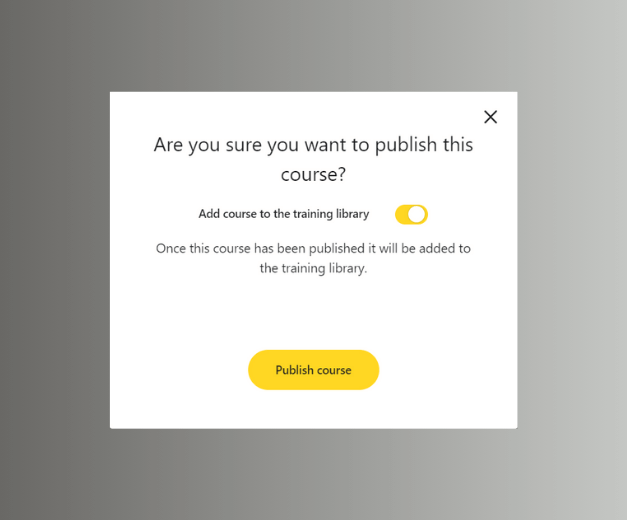
Once you're happy with your creation, you’re ready! Hit that Publish button!

You can choose to add your course to the Training Library (all your learners will be able to see it), or not. If you publish your course without adding it to the library, only learners who have been assigned to that course will be able to see it. If you change your mind later, you can always add it so everyone can see it.
 Congrats on launching your first GoSkills course!🎉