
You can lock cells in Excel to protect them from being edited. It may be that you want to lock specific cells or ranges so that your formulas won’t be exposed or accidentally deleted.
Maybe you want to prevent users from moving data around by sorting or deleting cells. Or you might even want to protect your entire worksheet by requiring a password for users to view the document.
Let’s look at how to lock cells in Excel.
Lock specific cells or ranges
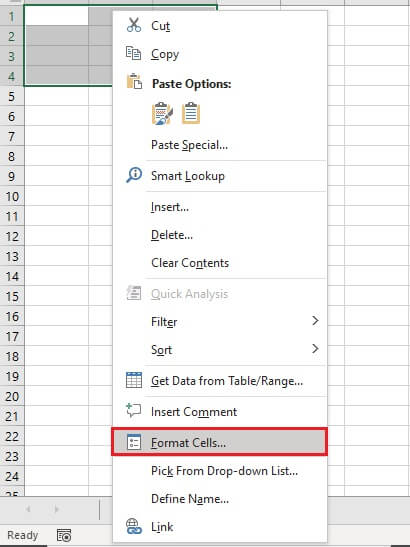
It surprises some people to know that in Excel, all cells are locked by default. Check it out. Select any cell or group of cells in a new worksheet. Right-click and select Format Cells... from the context menu (or just press the Ctrl+1 shortcut).
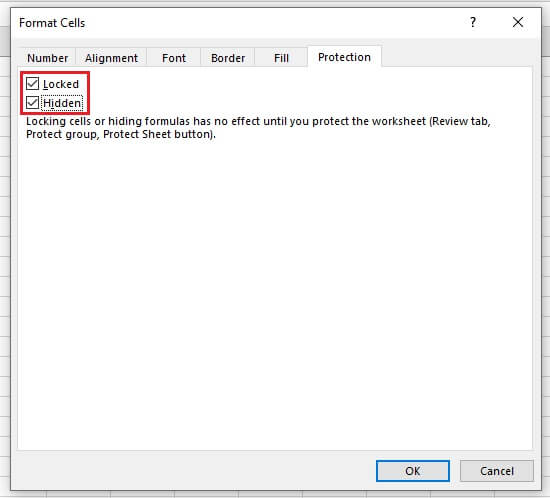
 Click the Protection tab and you will notice that “Locked” is checked by default.
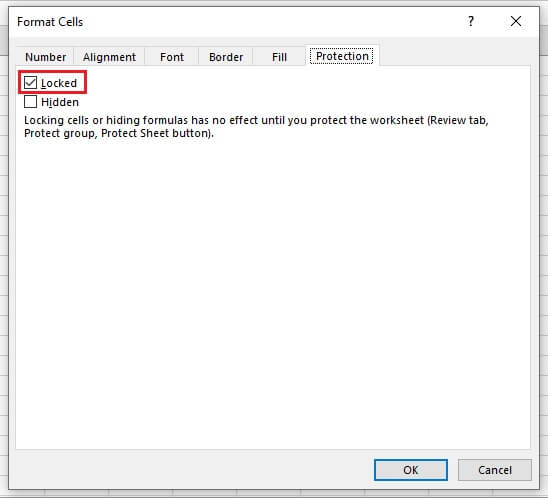 The reason you may not have noticed this before is that the worksheet itself is still unprotected. Locking cells has no effect until the worksheet is protected, as stated in the Format Cells dialog box.
This means if you want to protect specific cells, you’ll need to take a reverse approach by doing the following:
- First, unlock all cells. You can do this quickly by:
- Pressing Ctrl+A or clicking the Select All button (in the left corner between Column A and Row 1).
- Right-clicking and choosing Format Cells… from the context menu.
- Going to the Protection tab and unchecking the Locked checkbox.
- Next, select the cell, cells, or range you want to protect and lock them.
- Right-click and choose Format Cells… from the context menu.
- Go to the Protection tab and tick the Locked checkbox.
- Press OK.
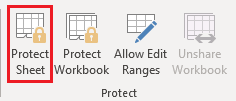
- Go to the Review tab and click Protect Sheet from the Protect command group.
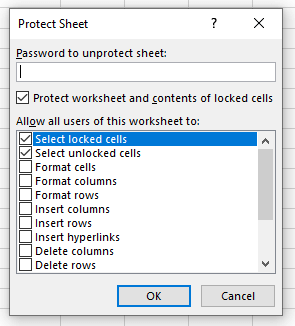
- In the first field, you may want to specify a password to unprotect the sheet. You’ll be asked to confirm the password.
- Passwords can be any length, can contain any characters, and are case sensitive.
- There is no system to restore lost or forgotten passwords, so be sure to use one you’ll remember.
- Press OK.
 Locked cells will be uneditable, but you will still be able to make changes to the contents of unlocked cells.
Other actions (including sorting, filtering, and formatting) must be specifically enabled in the Protect Sheet dialog box. Otherwise, these actions will not be allowed.
Lock formula cells
You might want to lock all cells containing formulas so that people cannot delete or adjust them. You may even want to hide the formula so that others will see the result of the formula without being able to see the formula itself.
If you have a worksheet with several formulas, it can be a daunting task to try to find them all. Fortunately, you don’t have to go through the trouble of manually locating cells with formulas. Excel has a feature that can find them for you.
Step 1 - Unlock all cells
Select all cells in the worksheet. Right-click and select Format Cells from the context menu. Go to the Protection tab, and uncheck the Locked checkbox.
Step 2 - Get Excel to find all cells with formulas
From the Home tab, look in the Editing command group and click the Find & Select command. In the dropdown menu, you can select Formulas and Excel will immediately highlight all cells within the worksheet which contain formulas.
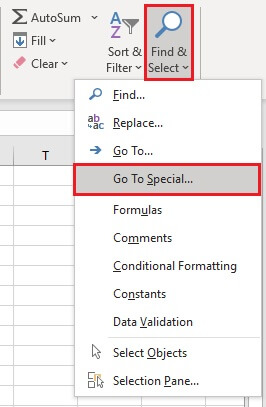
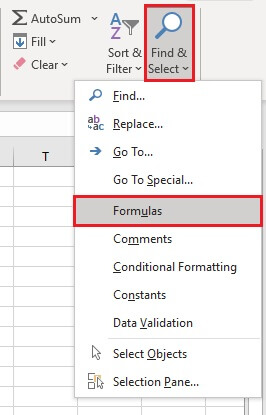 If you want to be a bit more specific about which formulas to highlight, click Go To Special… from the Find & Select dropdown menu.
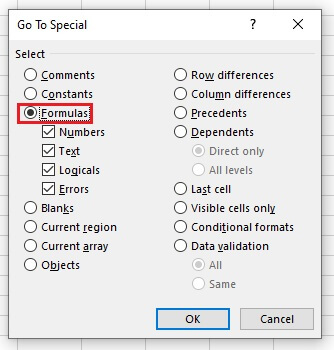
 Select the Formulas radio button, and you can select and deselect formulas that return Numbers, Text, Logical values, or Errors as you wish.
Step 3 - Lock the highlighted cells
Click OK, and Excel will highlight the cells with formulas as requested. From there, we can right-click (or press Ctrl+1) to get the Format Cells dialog box and lock the highlighted cells using the Protection tab.

Step 4 - Choose password (optional) & select actions allowed
Checking all boxes in the Protect Sheet dialog box will allow users to work within the sheet as usual. They will still be able to select cells with formulas, and the formulas themselves will be visible, but the formulas can only be adjusted or deleted by clicking the Unprotect Sheet command and entering the password, if any.
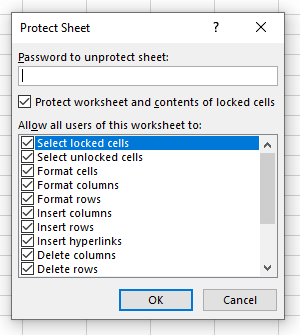 Checking all the other boxes ensures that unlocked cells and other editing features will be available as usual.
Download your free practice file!
Use this free Excel file to practice along with the tutorial.
Hide formulas
Sometimes you don’t want people to edit or even see your formulas at all. To do this:
- Follow steps 1 and 2 in the Lock formula cells section above.
- Go to the Format Cells dialog box, and tick both the Locked and Hidden checkboxes under the Protection tab.
- Press OK.
- Go to the Review tab and click Protect Sheet.
- Choose a password, if desired. You can allow users to select cells with formulas by checking the Select locked cells checkbox along with all the others, but the formulas will still be hidden. If you prefer, uncheck the Select locked cells checkbox and they will not be able to select those cells at all.
How to protect an entire worksheet from being edited
Since all cells are locked by default, protecting an entire worksheet in Excel can be done quite easily:
- Go to the Review tab.
- Look within the Protect command group.
- Click the Protect Sheet command.
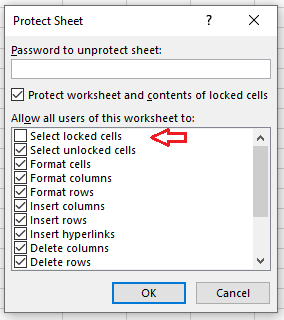
 This command opens a window that allows you to choose a password to unlock the worksheet, and also the option to enable actions such as sorting, filtering, formatting, and so on. Otherwise, these actions will not be allowed.
Select locked and unlocked cells options
The ‘Select locked cells’ and ‘Select unlocked cells’ options are checked by default. Leaving them that way allows users to select cells. If the worksheet is protected, they won’t be able to make changes to locked cells, but they will be able to click them and view their contents in the Formula Bar.
- If you uncheck ‘Select locked cells’ users will only be able to see what is displayed in locked cells but will not be able to click on them when navigating through the spreadsheet.
- It is not possible to check ‘Select locked cells’ and uncheck ‘Select unlocked cells’ simultaneously.
- If you uncheck both ‘Select locked cells’ and ‘Select unlocked cells’ you have effectively made the document read-only.
Allow users to perform specific actions within protected sheets
The other options in the Protect Sheet window are unchecked by default. If you do want to allow users to be able to perform any of the stated actions while the sheet is protected, scroll through the list and check the options as desired.
Once you click OK from the Protect Sheet dialog box, all locked cells will now be protected.
Unlock a worksheet or cells within a worksheet
To unlock a worksheet, simply navigate to the Review tab and look for Unprotect Sheet within the Protect command group. If the sheet was password-protected, enter the password and click OK.
If there are several worksheets with locked cells, you might find it quicker to unprotect them by doing the following:
- Go to the File menu tab.
- Click Info.
- In the Protect Workbook section, click Unprotect for the worksheets you want to unprotect.
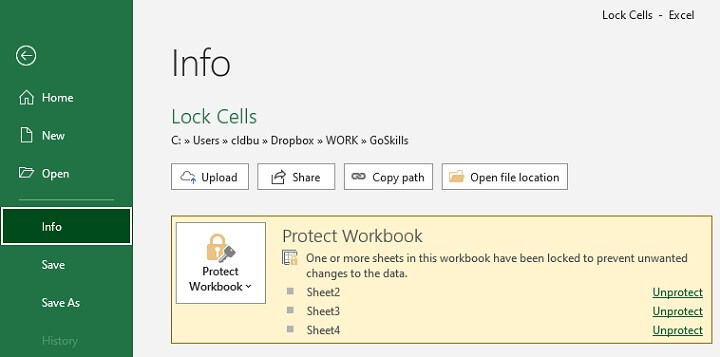 The password must be entered for each sheet, but this method is potentially quicker than navigating to each sheet within the workbook.
Allow edit ranges
You may have a document that will be accessed by various people for different purposes. Here is an example:
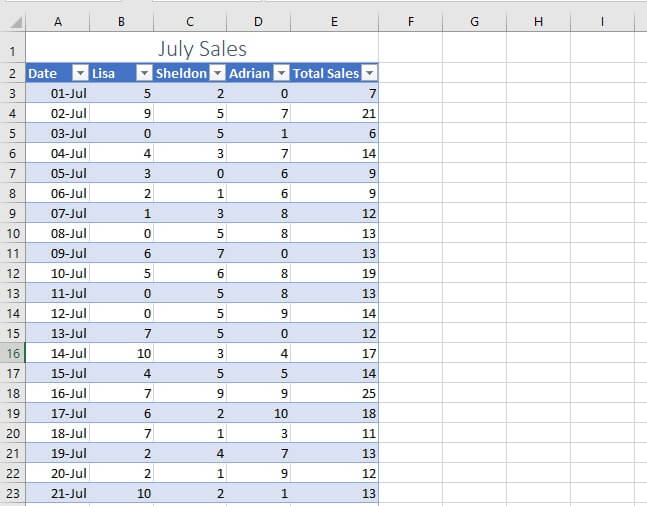 Perhaps this table should be viewable by all team members. But we want the data entry clerks to be limited to editing the first four columns only, while the analysts should be able to edit the last column. We can make one password for the first four columns of the table, and a separate password for the last column.
To apply separate passwords to ranges in a worksheet, follow these steps:
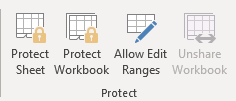
- Go to the Review tab and click Allow Edit Ranges.
- In the Allow Users to Edit Ranges dialog box, click New.
- In the New Range dialog box, you can give the first range a name. In our example, we can enter the name Input in the Title field.
- In the Refers to cells field, we specify that this refers to the range A2:D33.
- In the Range password box, type data and click OK. You will be asked to confirm the password. Type it again and click OK.

- This will take you back to the Allow Users to Edit Ranges dialog box. Click New again.
- Repeat steps 3 through 5 for the E2:E33 range. We will name the E2:E33 range Sales, and use formulas as the password. Confirm the password.
- Since locking cells or cell ranges has no effect unless the worksheet is protected, click Protect Sheet.
- In the Password to unprotect sheet box, type sales, and then click OK. Confirm the password, then click OK.
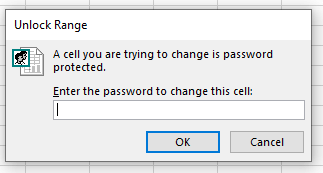
To edit any cell in the range A2:D33, you must first enter the password data. To edit any cell in the range E2:E33 you must first enter the password formulas.
 To unprotect the sheet, you must enter the password sales.
Protect workbook
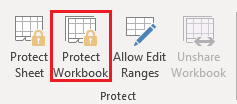 Right next to the Protect Sheet command on the Review tab is the Protect Workbook command. This command has no effect on the ability to lock or unlock cells.
With this command, you can force users to enter a password if they want to make structural changes to the workbook like adding, deleting, hiding, unhiding, or moving sheets. It is very different from protecting, or encrypting, the file (see below).
Protect a file
Protecting a file with a password means locking the entire file so that users cannot view it without entering that password. To do this, take the following steps:
- Click the File tab.
- Click Info.
- Click the Protect Workbook dropdown.
- Click Encrypt with Password.
- Enter the desired password and confirm.
 With this option, anyone who wants to open the file will need to enter the password. If you want to apply further protection mechanisms to prevent editing or other changes, you would need to select from one or more of the above options as applicable.
Learn more
As you can see, you can protect data in Excel at different levels by locking cells, ranges, formulas, sheets, or even the entire file. Combining different types of security measures will enable you to get exactly the result you want.
Learn more about Excel with our Excel Basic and Advanced course today!