
Look at the nearest Microsoft Word document you have. There’s a good chance that it’s a document that’s just a few pages long. And without a Word table of contents.
But pick up software documentation or a research report. It wouldn’t be called a “professional document” without a pretty well-formatted Table of Contents.
You shouldn’t look at the job of making a Table of Contents (we will occasionally call it a TOC also) as a chore. Making a TOC isn’t only for dense reports or your next bestseller. It can be for something as simple as a daily journal or a school assignment. You should create a Table of Contents whenever appropriate.
Microsoft Word makes it easy. We will look into a few ways to create a Table of Contents in Word.
But first, let’s go into the benefits of a Table of Contents for a Word document.
Get your free Word shortcuts cheatsheet!
Download the print-ready shortcut cheatsheet for Word.
Why is a Table of Contents so essential?
Are TOCs relevant when we have bookmarks and advanced search features on digital devices? The short answer is -- Yes. A Table of Contents isn’t just for navigating long documents.
Here are five benefits you should immediately look at:
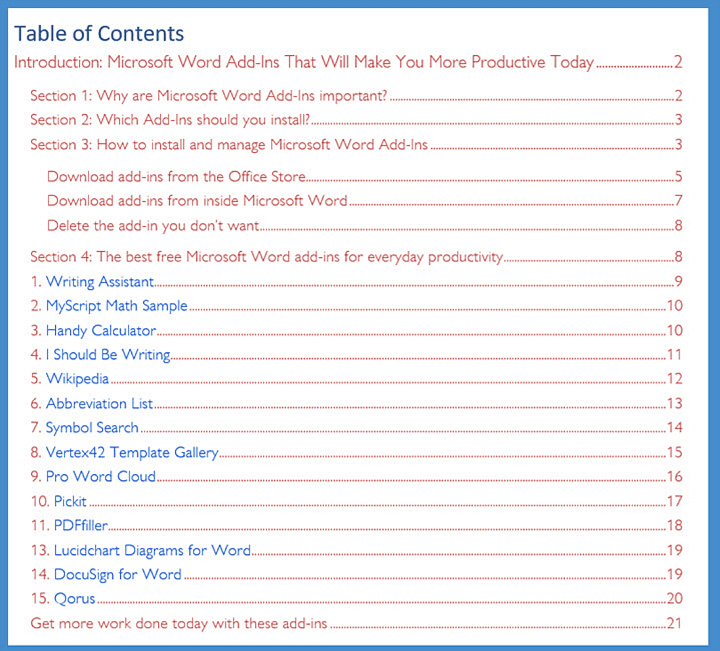
- It gives the reader a bird’s eye view of the document. A TOC is like an outline. At a glance, you can see how a document will flow from one topic to the next.
- It makes a document look professional. A document with a TOC looks more organized and professional than a document that lacks one.
- It is a key organizational aid for the author. Think of it like a roadmap and the first draft for a TOC can help you arrange your thoughts (and even brainstorm).
- It makes a document easier to discuss. A TOC can signal the quality of the document. Your teacher or your book agent can tell at a glance if the material is worth a read by just glancing at the table of contents.
- It gives you a learning path. A TOC is a well-ordered series of steps. Steal them from an instructional book to understand the learning path on any subject of your choice.
Check out this quick video on how to create a table of contents in Word:
How to create a Table of Contents in Word
Microsoft Word can automatically build a Table of Contents for you. You need to only outline the content and then specify the heading styles with basic formatting. Let’s take this step by step.
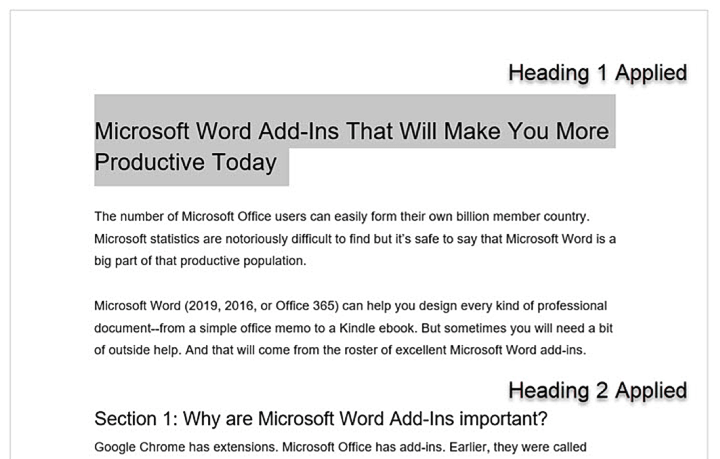
1. Format your document using heading styles. Select each chapter in your document and apply Heading Styles to them. Here, you are marking up the section headers so that Word can recognize them.
Go to Ribbon > Home > Styles. Select the text and apply headings for all the text you want to include in the table of contents.
 You can create a hierarchy within the main chapters with the help of the heading styles. For instance, use Heading 1 for new sections or chapters. Heading 2 for subsections within the section, and Heading 3 for smaller units or topics inside them.
Word scans the document for any text formatted as either Heading 1, 2, or 3 and then uses these to create the format for the TOC.
2. Position the Table of Contents on the page. Place the cursor on the specific position where you want the TOC to appear in your document. This is commonly somewhere at the beginning of the document.
4. Click the Table of Contents command. Go to Ribbon > References > Table of Contents. Choose from one of the two automatic types available. The only difference between the two is the heading of "Contents" or "Table of Contents" at the top.
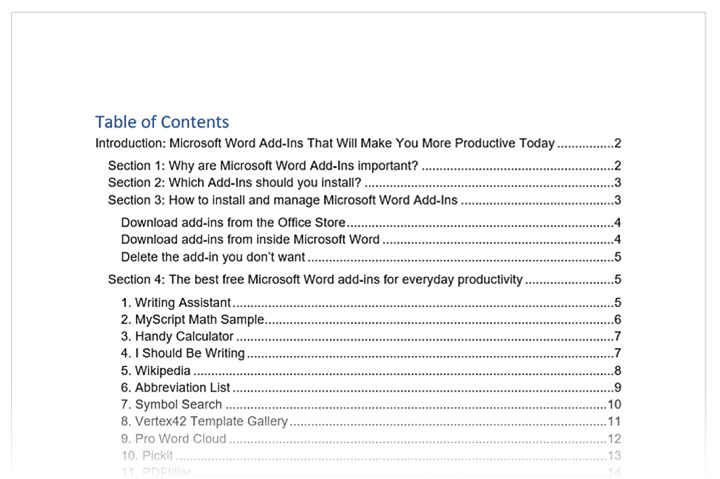
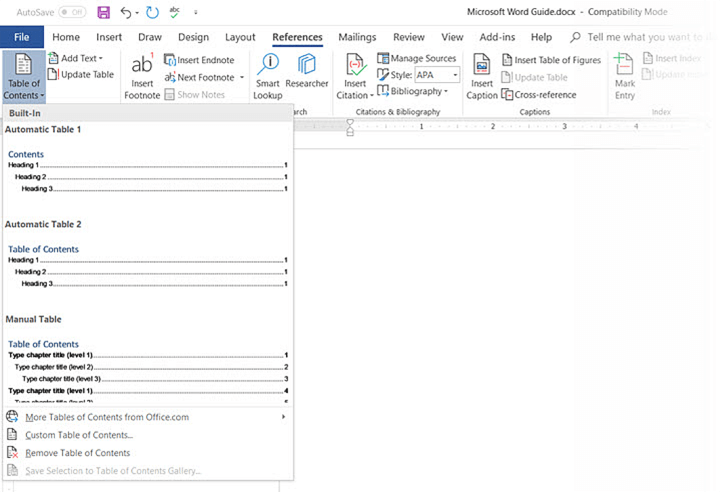 5. The Table of Contents is inserted automatically. Word scans the document and uses the heading styles to construct the order of the sections and subsections and their page numbers. This is a barebones TOC and you can continue to work with this and make it more stylish.
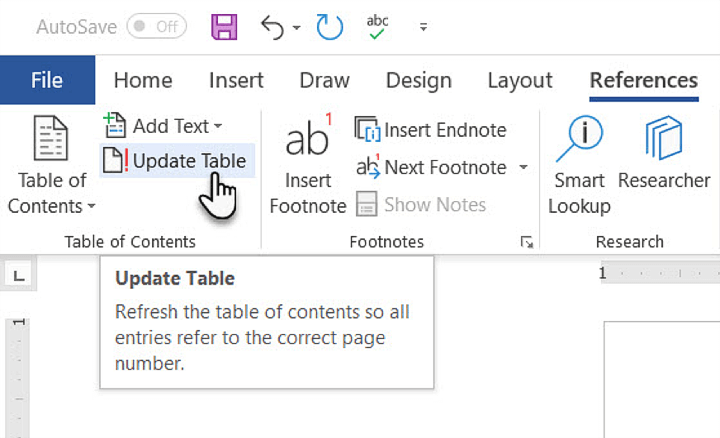
6. Update the Table of Contents anytime. You can always update a Table of Contents that has been created automatically. Update the table if you change the heading styles, rearrange the contents, or change the text. Also, update it if you make any changes to the content that affects the page numbers.
To update a table of contents that was created automatically, click References > Update Table.
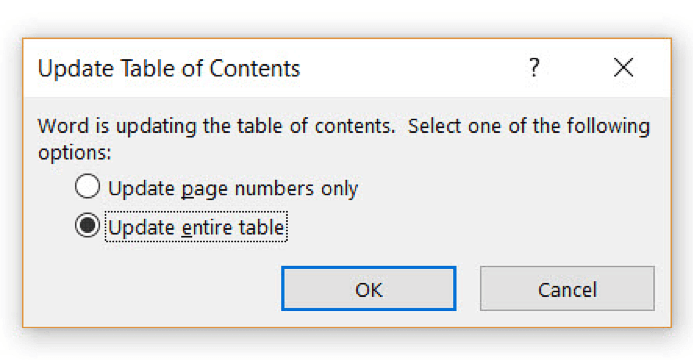
 Choose to Update page numbers only or Update entire table if you want to update the page numbers and the text.
 7. Create a Table of Contents manually. When the automatic method is so effortless, why would you feel the need to make one manually? There could be two reasons:
- The document is without any styles which Word can recognize.
- The document has too much of variety makes an automatic TOC difficult.
To create a manual table, go to References > Table of Contents > Click the dropdown to reveal the option for Manual Table.
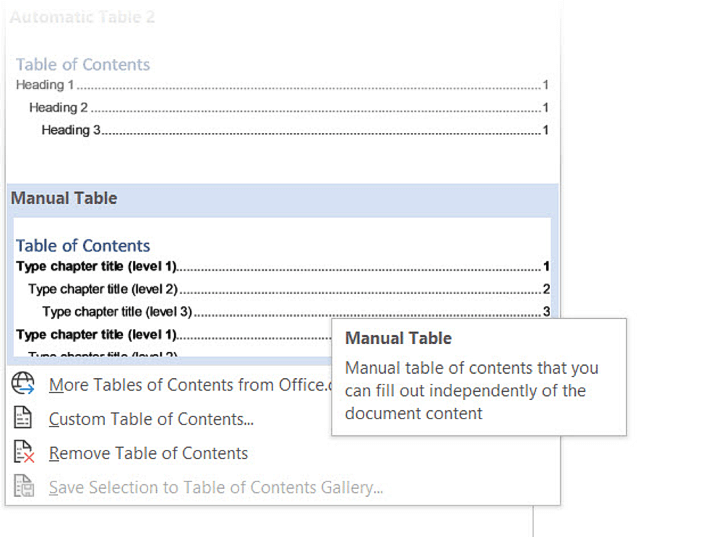
Microsoft Word inserts a TOC with placeholders which you can now edit. You can modify this with your own fonts and colors. Do remember that you also have to insert the page numbers manually too.
A TOC created manually cannot be updated automatically.
You do not have to settle for the basic Table of Contents that Microsoft Word creates for you. You can modify any TOC and even create a custom Table of Contents of your own.
How to customize the Table of Contents
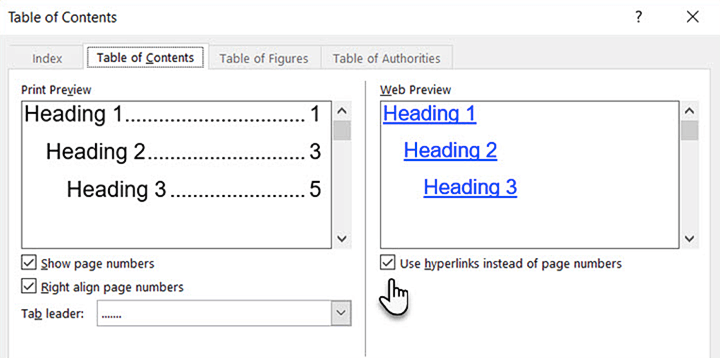
You can easily customize a TOC with the Table of Contents dialog box. Go to References > Table of Contents > Custom Table of Contents to launch the dialog.
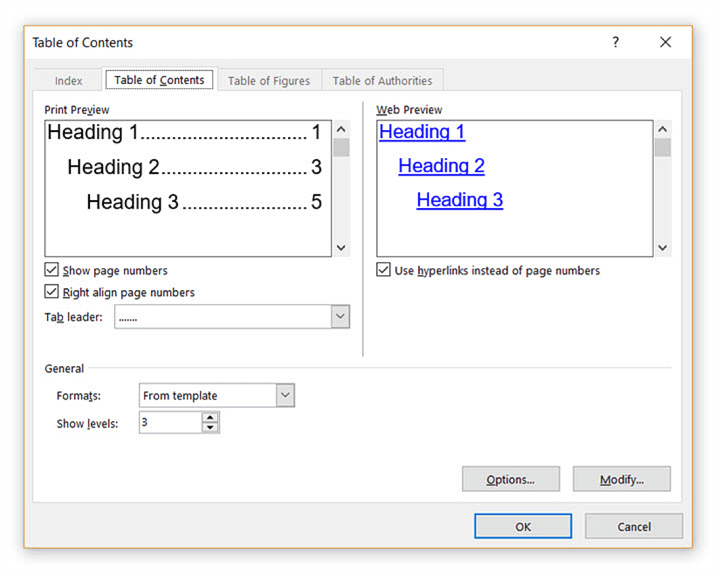
Any changes you make here will be visible in the Print Preview and Web Preview windows.
Seven advanced techniques to customize the TOC
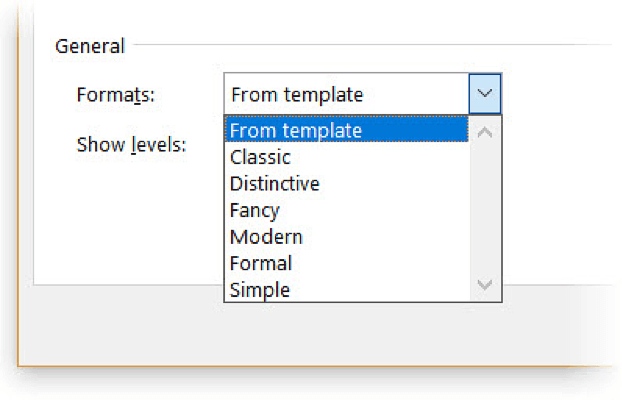
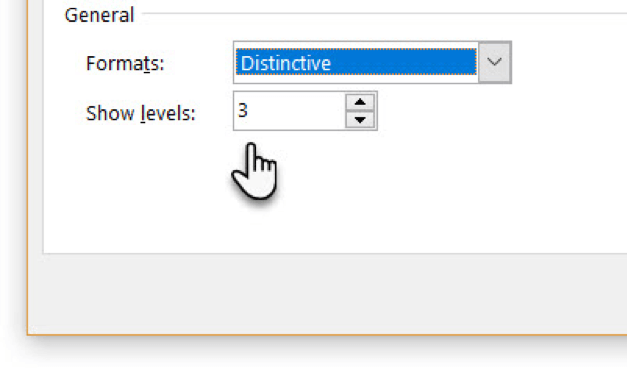
1. Choose a different format for the TOC
You can change an entire table by choosing a different format. In the General section, expand the dropdown for Formats and choose an appearance.
2. Change the appearance of the items in the TOC
Remember, the appearance of your TOC is ultimately controlled by style definitions. You may want to tweak the overall look of the TOC by creating your own styles for the headings. These modified styles can be saved alongside the in-built ones and applied across the document for a consistent look. Follow these steps.
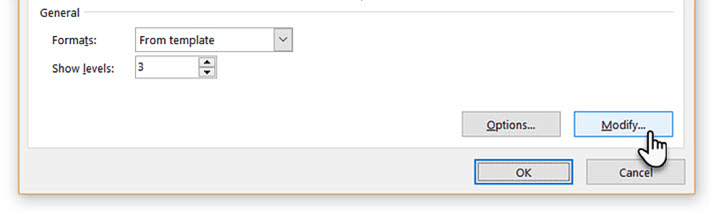
1. Click Modify. If the Modify button is grayed out, change Formats to From template.
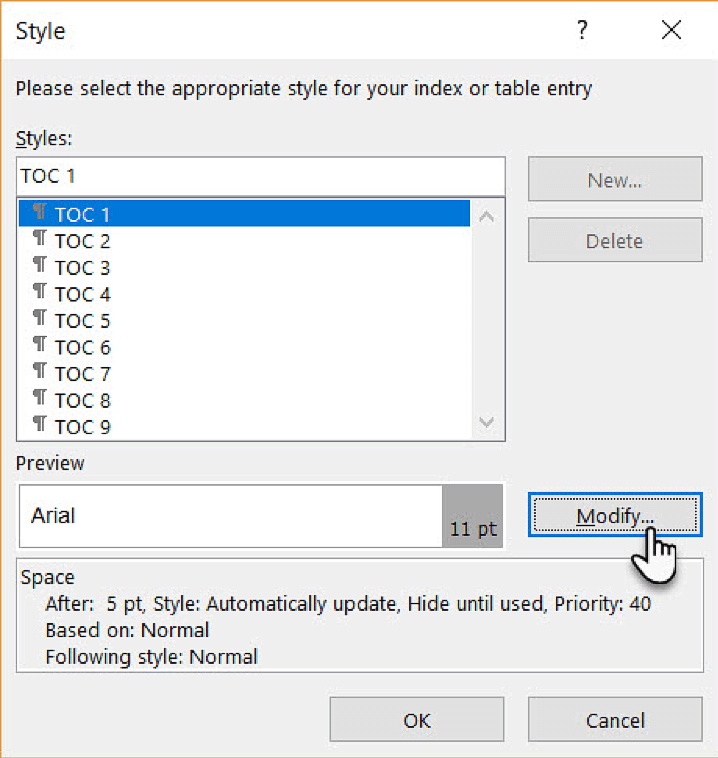
 2. In the Styles list, click the level that you want to change and then click Modify. Here, TOC 1 corresponds to heading level 1 in your document, TOC 2 to heading level 2, TOC 3 to heading 3 and so on.
 3. In the Modify Style dialog box, you can change the font or its color. Make any other formatting change like text indentation and then click OK.
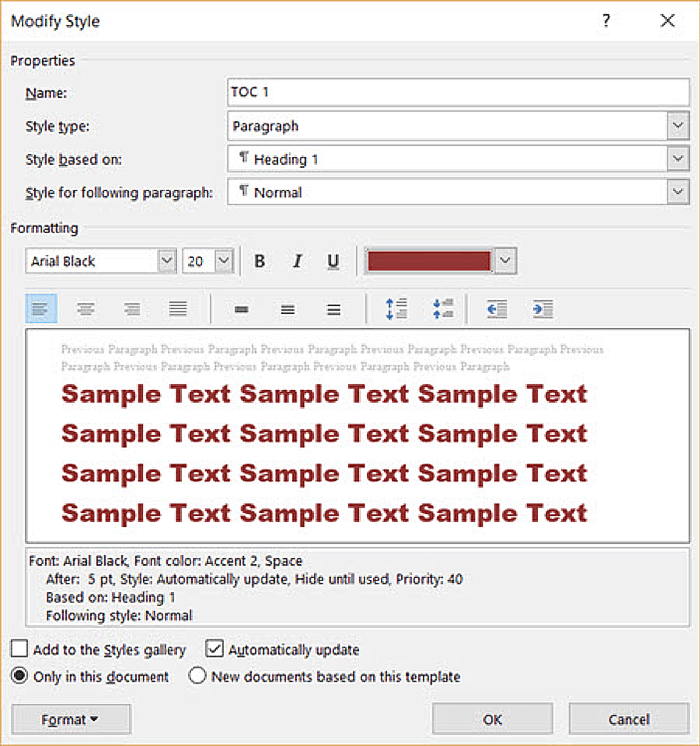
4. Before you click OK, you can choose whether the style change applies to the current document or to all future documents. To save it for future use, click the checkbox for Add to the Styles gallery.
3. Change the levels of the style headings shown
A TOC can be itemized, or you can just include the major sections. The Show levels number allows you to change the number of levels displayed in your table of contents. The “Levels” here refers to the style headings you have applied to your sections.
For instance: H1, H2, H3… etc. If you set it on 2, then all text with the Heading 1 style or the Heading 2 style is displayed.
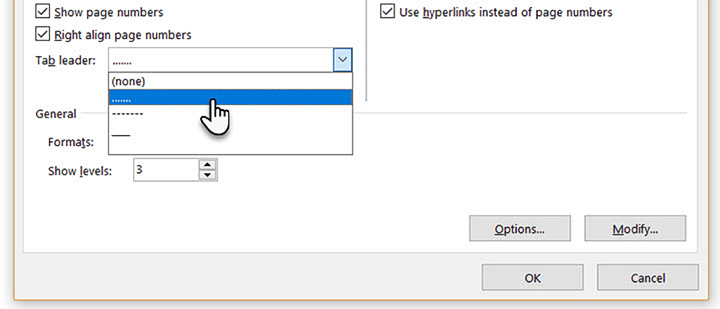
4. Change or add dot leaders in the TOC
Dot leaders are the lines or dots that connect the items in the index to page numbers. These leader lines are mentioned in many style guides as a necessary part of thesis documents.
In the Table of Contents dialog box, click the dropdown for the Tab leader list and select the dotted line option. Alternatively, choose the leader line you want or select “none” to remove it from the TOC.
5. Add a non-heading style
Word won’t include a non-heading style when it inserts an automatic TOC. By default, Word only includes headings 1 through 9. But it gives you a method to include any other style you create in the index. Let’s say you want to add another heading called “A Brief Guide” at the top of the content and the TOC.
In the Table of Contents dialog box, click the Options button to open this screen:
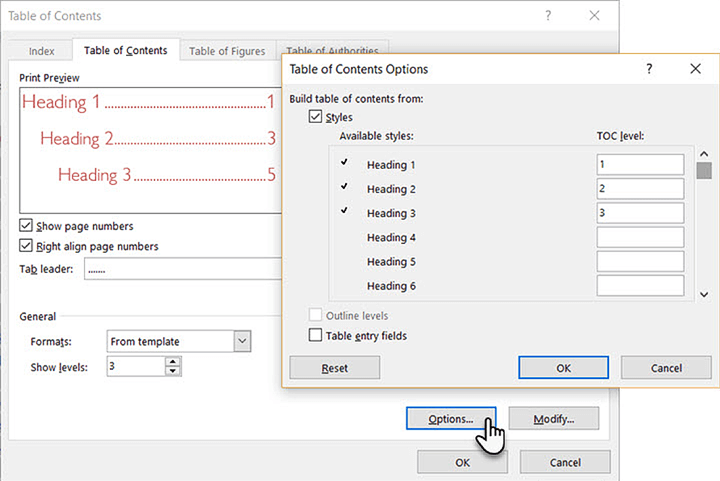
Right now, it maps the styles in use only to the TOC levels. As you can see, the three styles, Heading 1, Heading 2, and Heading 3 are mapped as levels 1. 2, and 3.
Go down the boxes until you find Title, which has no mapped TOC level. Enter 1 to map Title to the TOC top level.
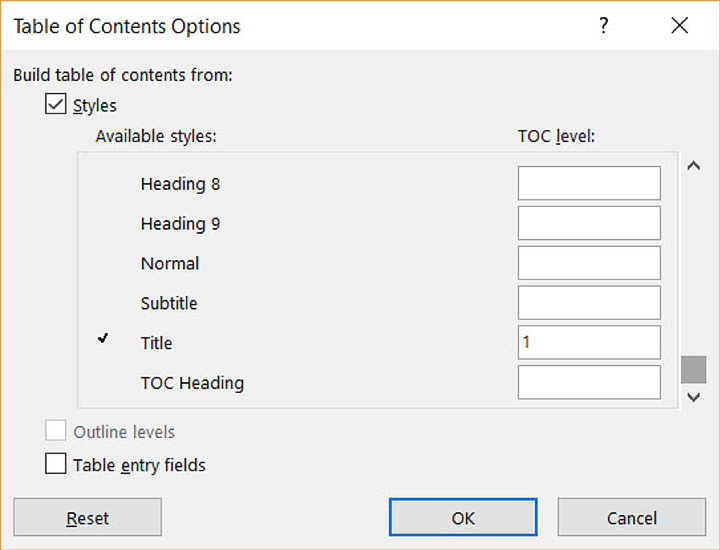
Click OK twice to exit the dialogs. Word will prompt you to replace the contents. Click Yes to replace the TOC.
6. Create a clickable Table of Contents
Creating a hyperlinked Table of Contents is expected in the digital age. Navigation is faster. It is also another condition to submit a thesis or dissertation.
Click the Use hyperlinks instead of page numbers checkbox.
Also, uncheck the Show page numbers box if you just want to use the hyperlinks.
7. Place a simple border around the Table of Contents
You can use Word’s Shapes feature to insert a border around the TOC. Set Shape Fill to “No Fill” and then add Shape Styles or use Format Shape to design the look of the pseudo-border around the table.
Remember to add Table of Contents to your documents
The automatic Table of Contents feature is a time saver. But to catch the eye, you need to dive into different styles and custom tables. To sum up:
- Structure your document.
- Decide the levels you want to display.
- Change the style attributes to match your needs.
As you begin making your own, you will have your own questions. Hopefully, this guide has illustrated the basic process well enough for you to take the plunge. Are you more comfortable with Table of Contents now?
If you are looking to sharpen your Microsoft Office skills, check out our Microsoft Word course to learn time-saving tips and tricks for formatting your documents.