
In this tutorial, we learn how to mail merge in Excel to Word to save time in producing multiple documents with personalized information.
Say you need to email groups of people who are attending training courses being conducted this week. The email should contain personalized information that details the title, date, time, and other useful information about the course they’re attending.
If you need to email hundreds of people, this task might seem overwhelming, and that's why mail merge is so useful.
Download your free practice file.
Practice using mail merge in Excel and Word with this file download.
What is mail merge?
A mail merge works by importing a source document with personalized values, in this instance, an Excel data set, into a Word document. A separate document is generated for each record in the Excel list.
The Word document contains mail merge fields for the input of personalized information. When the document is merged, the mail merge fields are replaced by the values from the corresponding record in the Excel list.
A 'mail merge' means using a single document and a source list to generate a personalized copy for each recipient.
What can you use mail merge for?
Any Word document can be used for a mail merge from Excel. Examples include reports, certificates, invitations, leaflets, labels, and of course, letters from where it gets its name.
In short, any scenario where you need to produce multiple copies of the Word document with information that changes for each recipient. This information is typically personal data such as name and address, but it can be any information you have in the spreadsheet that you want to include in the finished document.
This tutorial will demonstrate two mail merges in Word from Excel examples. One is to send a personalized email to recipients in an Excel spreadsheet. And a second example is where we merge from Excel to Word labels.
Step 1 - Prepare your Excel list for mail merge
When preparing a spreadsheet for mail merge, a simple Excel list is all that is required.
It is important to use the first row in your list for headers. These header names will become the title of the mail merge fields during the process of merging, so they should be easy to identify.
The following image shows the Excel list that will be used for our first mail merge from the Excel example.
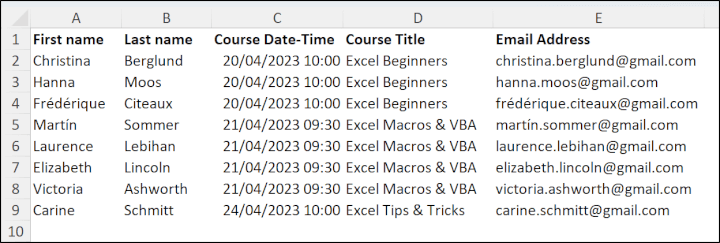
It includes columns/fields such as name, course title, and date-time, which are required for the personal details in the email. And also a column containing the email address of each recipient.
The Excel workbook should be closed before you begin the mail merge process.
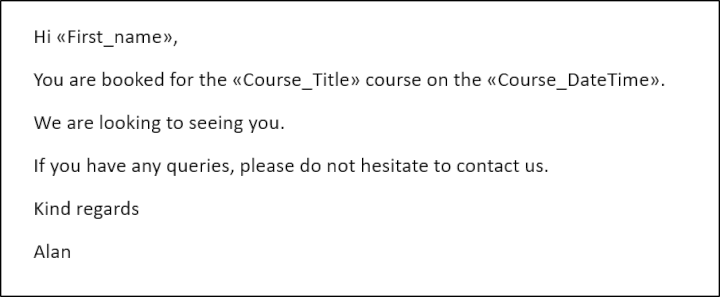
For this example, we also have our reminder email written. This is a standard document that we will send to all course attendees. An asterisk has been entered in the place where the mail merge field will be inserted later in this tutorial.

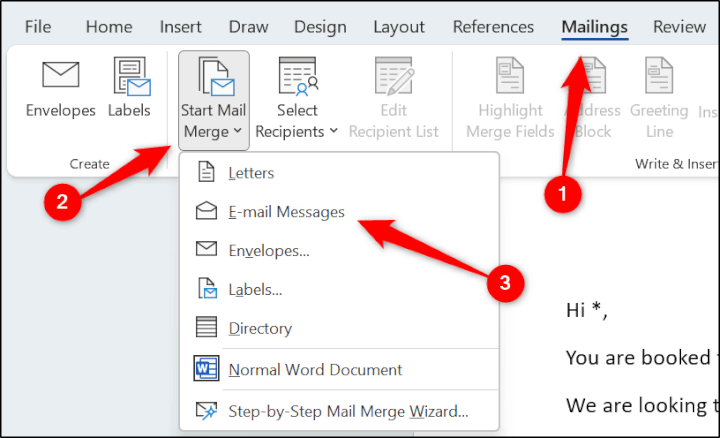
You can then begin the mail merge by specifying the type of document you are merging.
Click Mailings > Start Mail Merge > Email Messages.
Step 2 - Connect to the Excel list
The next step is to connect to the Excel workbook that contains the list to merge with.
From the Mailings tab, click Select Recipients > Use an Existing List. Locate and select the data-source.xlsx workbook that we are using for the data source of our Excel mail merge.
The Select Table window lists all sheets within the workbook. The Data sheet contains the course attendee details we need for this first example.
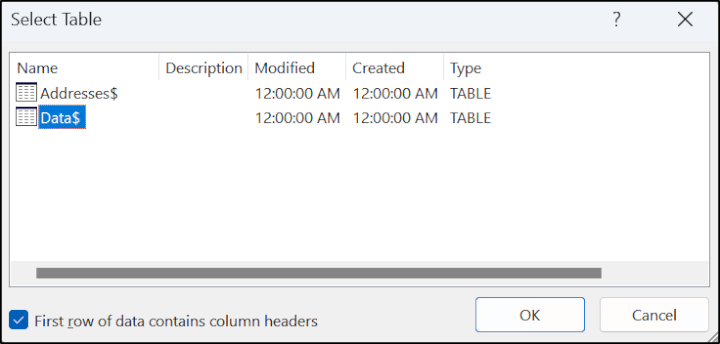
Select the Data sheet in the list and click OK.
The Word document is connected to the Excel workbook and ready to use the data for its data source. Buttons on the Mailings tab including Edit Recipient List, Insert Merge Field, and Finish & Merge are active, confirming the connection to source data.
Step 3 - Edit the Recipient List
The Excel data is ready for use, but you might not want to merge all records in the Excel list. Thankfully, you can filter, sort, and manually exclude records from a mail merge.
Click the Edit Recipient List button on the Mailings tab of the Ribbon to show the Edit Recipients List window.
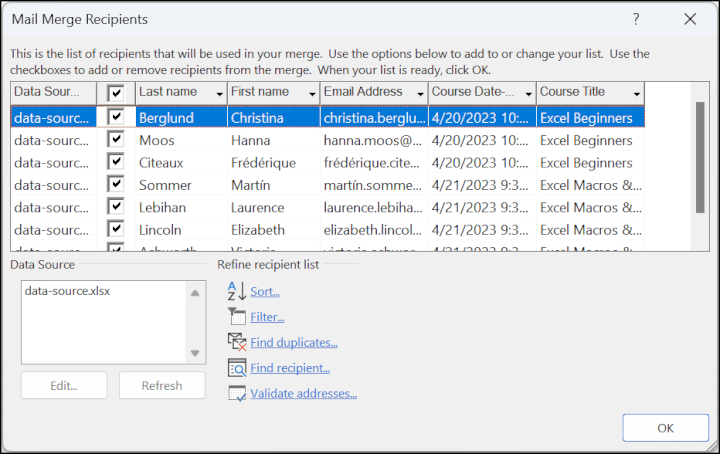
Note the filter arrows along the header row. These could be used to filter for attendees of a specific course only or for courses within a specific date range. Also, note the options to Find duplicates and the checkboxes to exclude specific records.
For this mail merge from Excel to Word example, we want to email course attendees for a specific week only.
- Click the Filter link below the list of records.
- In the Filter Records tab, of the Filter & Sort window, select Course Date-Time from the Field: list.
- In the Comparison: list, specify Greater than or equal.
- Type the 17/04/2023 (date written in dd/mm/yyyy format) in the Compare to: column.
- In the next row, state AND logic for the second logical test, and then specify Course Date-Time, Less than and enter the date of 22/04/2023.
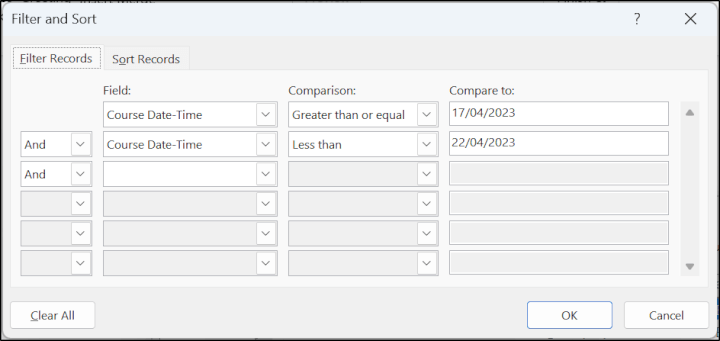
In this small practice data set, a course attendee on the 24th April 2023 (Carine Schmitt) has been excluded from the merge operation.
Step 4 - Insert merge fields
The next step in the mail merge process is to insert the mail merge fields. These fields are for the dynamic values in our Word document i.e., attendee name, course title, and the course date & time.
Let’s start by inserting the merge field for the First name column.
- Click on the document where you want to insert the merge field. For the First name field, this is after the word “Hi”.
- Click the list arrow for the Insert Merge Field button and click First_name.
The merge field is inserted, as shown in the following image.
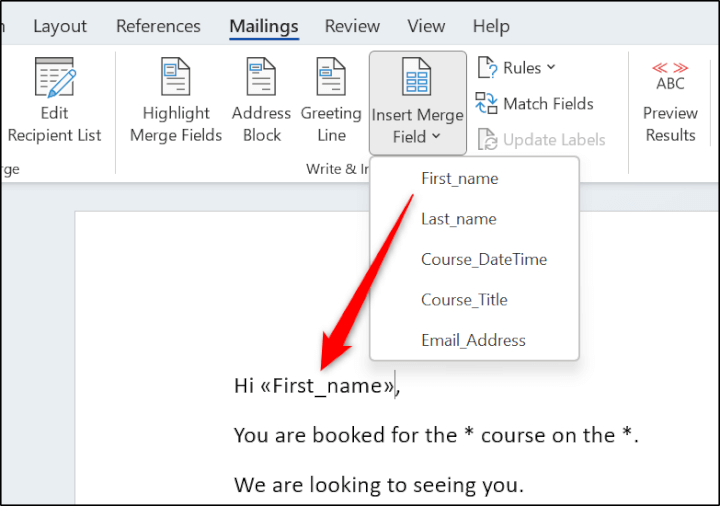
- Repeat these steps to insert the merge fields for the Course_Title and Course_DateTime (asterisks have been used in the document to mark where the merge fields are required).
The following image shows the email document with all merge fields inserted.
Step 5 - Preview the mail merge document
Next, it is advisable to preview the mail merge document. This provides an opportunity to check the format of the fields and to check how the document reads.
Click the Preview Results button on the Mailings tab of the Ribbon.
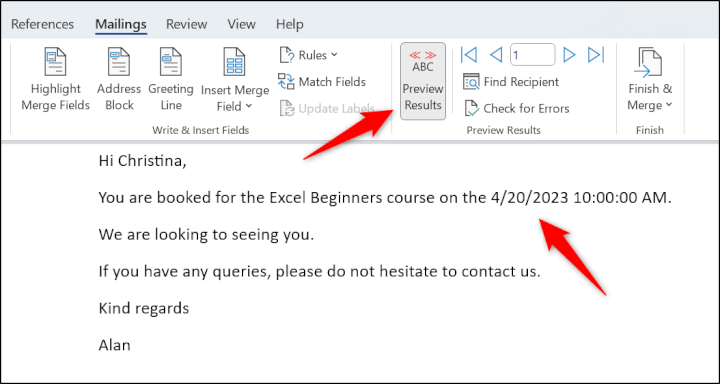
The results are shown in place of the mail merge fields. The Preview Results button can be used to toggle between the mail merge fields and their preview.
The arrow icons can be used to cycle through the list of recipients. This is helpful if you want to check specific records.
The Course_DateTime value is indicated with an arrow in the image above, as its format is incorrect. You may recall from earlier in the tutorial that the dates on the Excel spreadsheet were in a dd/mm/yyyy format. We saw this again when entering dates in the filter criteria.
However, the results of the mail merge are formatted in an mm/dd/yyyy format. Let’s fix this next.
Step 6 - Format mail merge fields
To fix the formatting of the mail merge fields, you need to edit the field code and add a switch argument.
- Click on the Course_DateTime field. The field is shaded in grey to indicate that it is selected.
- Press Shift + F9 on the keyboard, or right-click and click Toggle Field Codes to view the merge field code.
- Edit the field code to the following. Ensure the use of the uppercase M for months as a lowercase m represents minutes.
{ MERGEFIELD Course_DateTime\@ “dd/MM/yyyy HH:mm” }Note that code has been added for the time element also to remove the seconds from the course date-time format.

Press Shift + F9 to switch from the field code back to the mail merge field value. Then Press F9 to refresh the fields.
It is now formatted as required.

Step 7 - Finish the mail merge
Finally, it is time to perform the merge.
- Click Mailings > Finish & Merge > Send Email Messages.
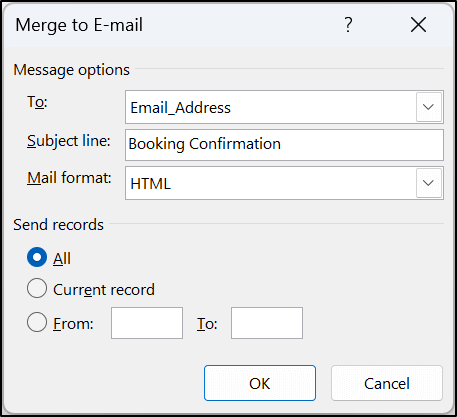
- In the Merge to E-mail window, ensure that Email_Address is selected in the To: field. This column from the Excel spreadsheet contains the recipients email addresses.
- Type “Booking Confirmation” for the Subject:.
- The remaining settings can stay as they are. We want to send to all records in our filtered data source.
- Click OK.
The emails are sent and can be found in the sent items folder of your default email service, such as Outlook.
In this example, we are working on a scenario where this email is sent each week to a new batch of course attendees.
Due to this, it makes sense to save the Word document.
Next week, one can edit the recipient list, just as we did earlier in this tutorial, to update the list of recipients and then finish and merge.
Download your free practice file.
Practice using mail merge in Excel and Word with this file download.
How to mail merge labels from Excel
For our second example, we will mail merge from Excel to Word labels.
This method is great for printing address labels for postage or printing labels with attendee names for an event.
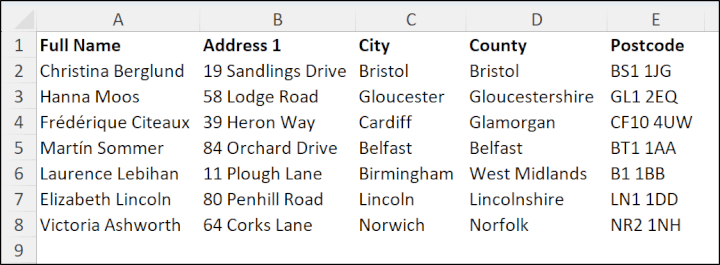
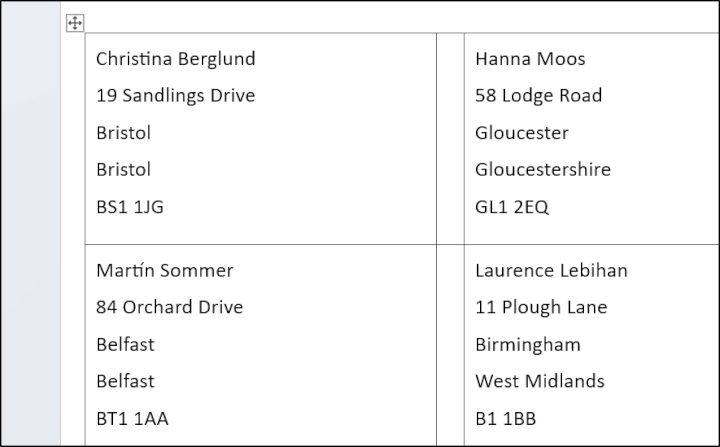
For this example, we will be working with the following list of data in Excel. It contains names and addresses we want to mail to label merge.
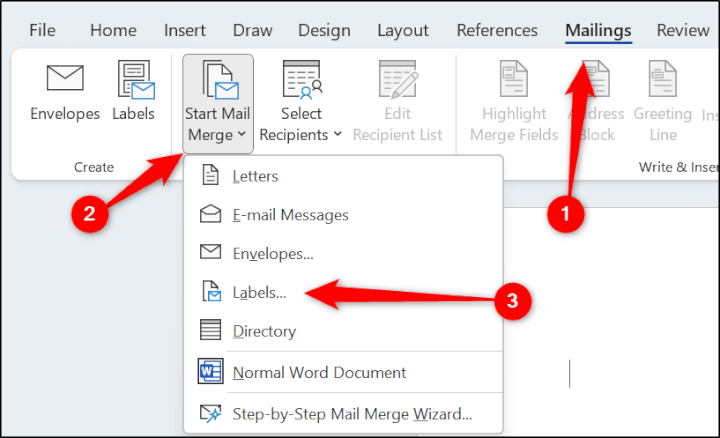
From a blank Word document, we will begin by starting a mail merge to labels and specifying which labels we are using.
- Click Mailings > Start Mail Merge > Labels.
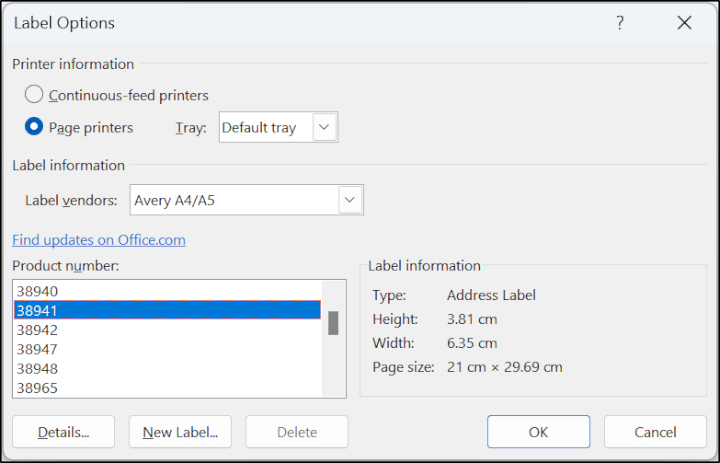
- From the Label Options window, state the labels that you are using and click Ok. For this example, Avery 38941 address labels have been specified.
If the labels that you are using are not in the vendor and product number lists provided, click Details and specify the custom dimensions for your labels.
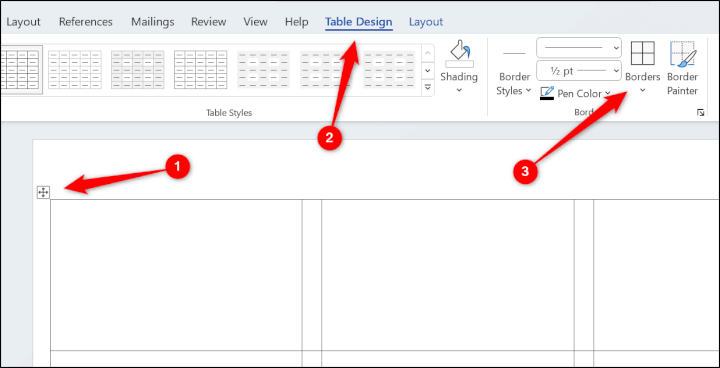
A table is inserted on the page with cells matching your labels' dimensions. By default, the table borders are not shown.
- Click the Select Table icon > Table Design > Borders > All Borders to show the outline of the labels.
We can now select the data source for the mail merge labels from Excel.
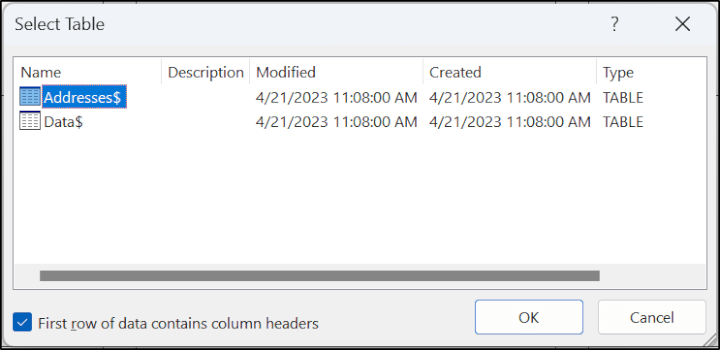
- Click Mailings > Select Recipients > Use an Existing List.
- Locate and select the data-source.xlsx workbook for the data source. Then select the Addresses sheet from the Select Table window and click OK.
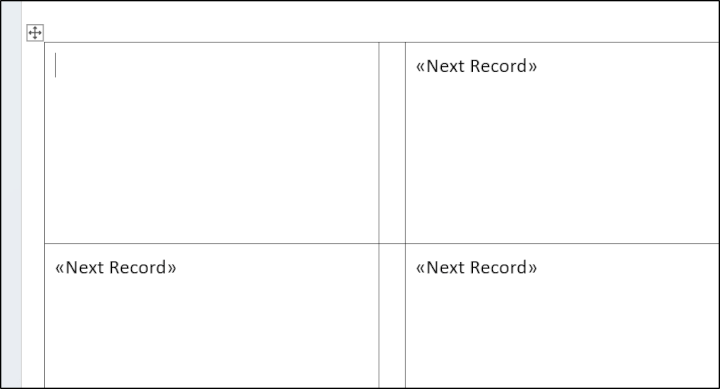
Next Record fields are inserted into all labels except the first one. This field code ensures that each label will use the details for the next record/row in the Excel data source.
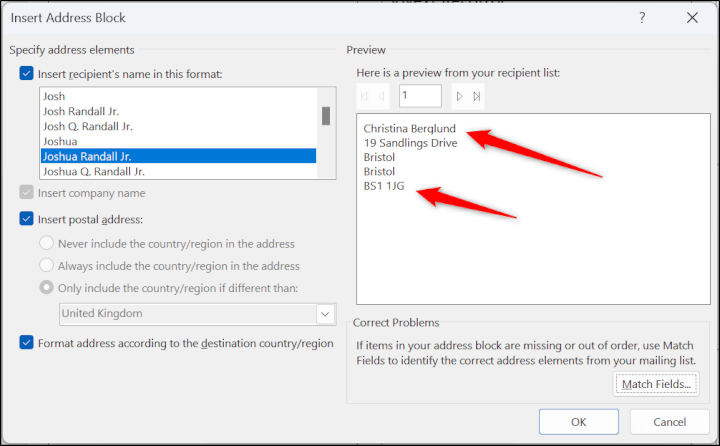
Let’s use the Address Block mail merge field for each label. The Address Block includes all name and address-related information in a block and is a useful alternative to manually inserting each name and address field.
- Click Mailings > Address Block.
The Insert Address Block window shows the recipient's name and postal address details included in the address block by default. It also shows different format options for the recipient's name.
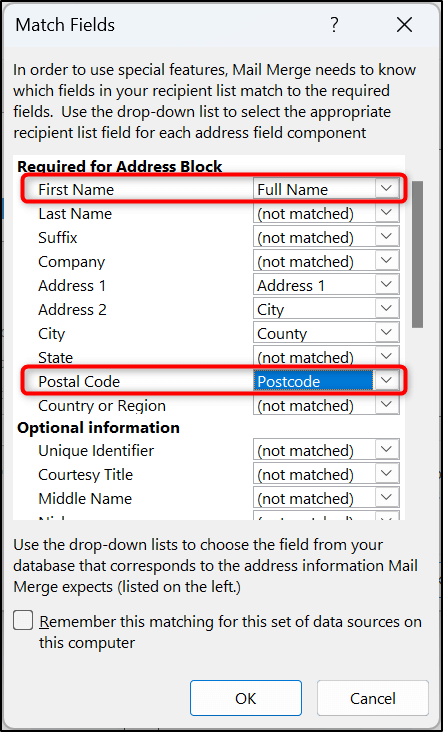
Yet, the recipient's name is not shown in the preview window. And neither is the Postcode field from our data source. Let’s fix these errors.
- Click the Match Fields button.

The issue is that some of the headers from our Excel data source were not recognized, and we need to match them to the appropriate mail merge field.
- Click the list for the First Name field and select Full Name. In our data, the first name and last name are stored in a single column/field named Full Name.
- Click the list for Postal Code and select Postcode.
- Click OK.
- The address block now successfully includes the Full Name and Postcode fields from our Excel file. Click OK.
- Click Mailings > Update Labels to repeat the Address Block merge field on all labels.
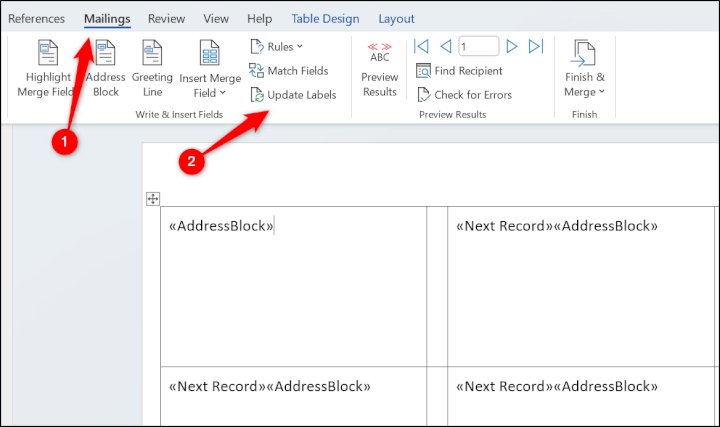
- Click Mailings > Preview Results to check the results of the mail merge from Excel before completing the merge. The preview looks great!
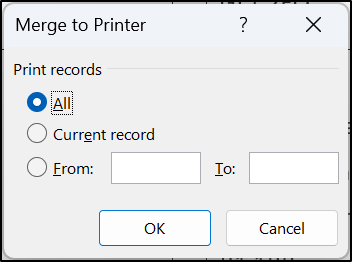
- Click Mailings > Finish & Merge > Print Documents.
- Our data has only a few records, so we can merge all records. There is the option in the Merge to Printer window to print in batches if required. Click OK.
As with the previous mail merge from Excel example, our labels Word document can be saved so that this mail merge process is not repeated in its entirety each time you print labels.
In this tutorial, we saw two examples of how to do a mail merge from Excel to Word - one to send out personalized emails and another to create personalized address labels. Mail merge in Word is very useful, and there are many other reasons that people benefit from its use.
Get more Microsoft Office skills
Whether you’re looking to upgrade your Word, Excel, PowerPoint, or other skills, we have courses ranging from beginner to advanced levels. Each course features bite-sized video tutorials and practical exercises to test what you have learned. Take your Microsoft Office skills to the next level with our full suite of CPD-accredited Microsoft Office courses, all taught by industry experts.