
The Excel Goal Seek feature is a what if analysis tool. Assuming that you know the single outcome you would like to achieve, Goal Seek allows you to arrive at that goal by working backwards to mathematically adjust a single, specified variable within the equation.
Goal Seek is often used in financial models but is also commonly used in sales, elections, and other types of forecasts.
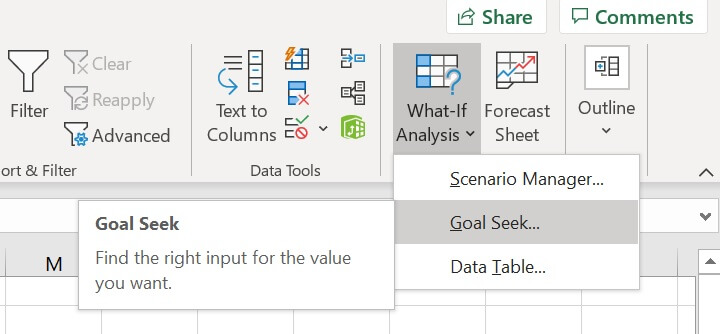
The Goal Seek command in Excel is located on the Data tab, within the Forecast command group, under the What-If Analysis dropdown menu.
Download your free Excel practice file!
Use this free Excel file to practice along with the Goal Seek tutorial.
Example 1
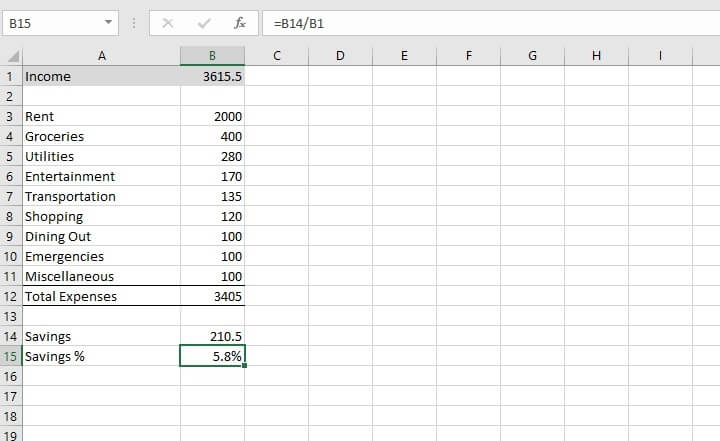
To illustrate how it works in a simple example, imagine that cell B1 (below) displays your monthly income, and cells B3 to B11 shows your expenses. Your savings (B14) are shown as the difference between the two and displayed as a percentage of your income in cell B15.
If you would like your savings to be 10% of your income, and assuming that you are unable to reduce your expenses, you realize that you must increase your income. But to how much?
By using the Goal Seek command, we can indicate a desired outcome, and Excel will determine the adjustment we need to make to a single variable. We will use Goal Seek to arrive at the required income value.
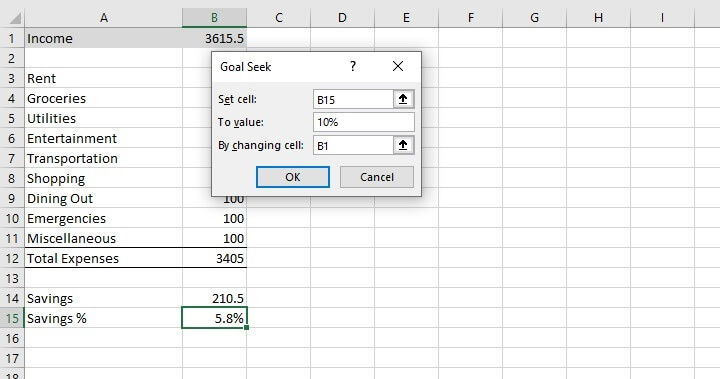
 After selecting the Goal Seek command, a pop-up window will appear. In ‘Set cell’, enter the cell reference, which will contain your desired result (in our case, B15). In the ‘To value’ field, enter the desired outcome (10%).
The third field (By changing cell) refers to the cell that you would like Excel to adjust (B1) in order to arrive at the desired result.
 After selecting OK, Excel will work backward to calculate the income required to allow 10% savings. Goal Seek attempts to come up with a solution that is an exact match to the target value.
At the end of the process, the Goal Seek pop-up window changes to a Goal Seek Status window, stating whether or not a solution was found, and a preview of the result is shown in the worksheet. To accept this figure, click OK in the Goal Seek Status window, and the value in the worksheet will be adjusted.
 Points to note:
- The Goal Seek feature only allows the adjustment of a single variable at a time.
- The cell chosen in the “Set cell” field must be a cell containing a formula.
- The cell chosen in the “By changing cell” field must be a cell containing a constant.
- Once “OK” is selected from the Goal Seek Status window, the values on the worksheet are adjusted and are only retrievable by selecting the ‘Undo’ command (Windows shortcut - CtrlZ / Mac shortcut - CmdZ).
Example 2
In a business setting, Goal Seek can also be used to determine break-even requirements when all other parameters are known.
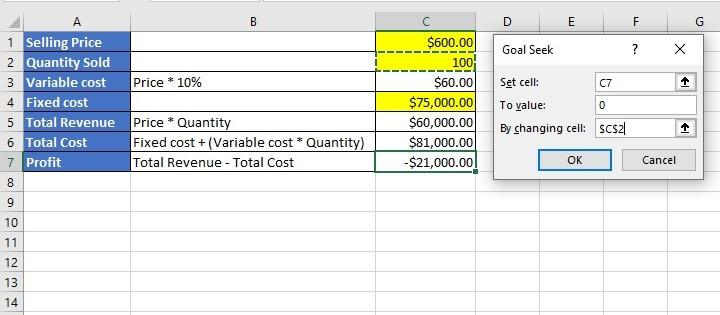
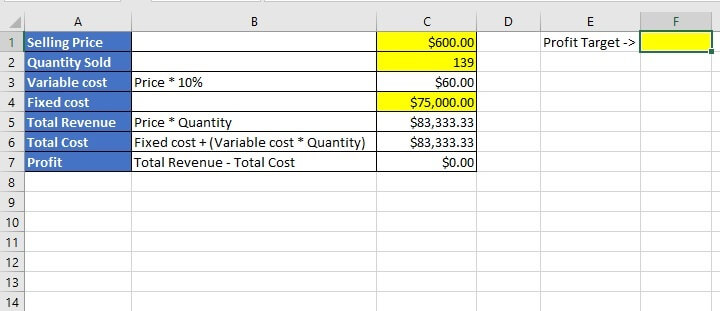
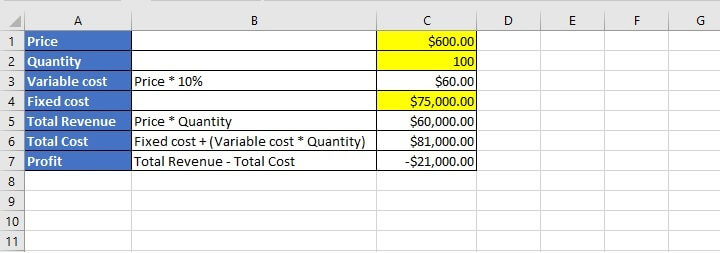 The values in cells C1, C2, and C4 are constants that are used as formulas to arrive at the values in the remaining cells. The company is posting a loss as shown in cell C7.
We can use Goal Seek to change either the Selling Price, the Quantity Sold or the Fixed Cost. The main characteristic of a fixed cost is, of course, its non-changeable nature, so that will remain at $75,000. Based on market factors, $600 is determined to be the best selling price, so the only value we have control over is the quantity sold (C2).
In the Goal Seek window, we set cell C7 to zero (break even), by changing C2 (quantity sold).
 Goal Seek found a solution within the parameters given.
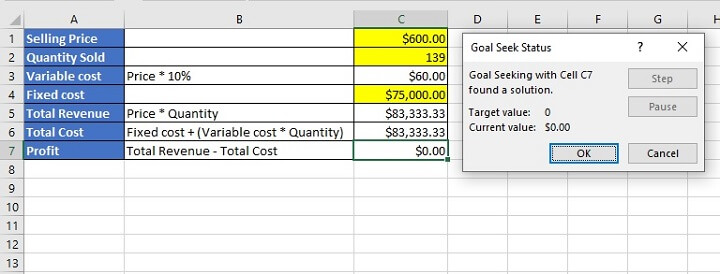 We click OK to accept, and the worksheet shows that we need to sell 139 units in order to break even.
Troubleshooting Goal Seek
There may be times when it seems that Goal Seek is not working because it was unable to find a solution based on the parameters submitted.
In the example below, we want to know how many sales we would need to make in order to earn $3,600 in income, using the parameters stated in A1 to C2. We attempted to use Goal Seek but received the following message.
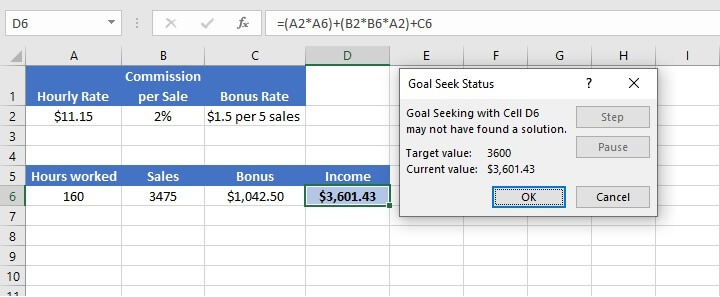 In the above case, though Goal Seek found that the value of 3,475 sales came close, it is not considered a solution because the target value of $3,600 (rounded to the nearest thousandth) is not met.
This is usually due to two factors:
- Maximum iterations (the number of attempts Excel can make to arrive at a solution).
- Maximum change (the degree of accuracy required of Excel’s solution).
For situations where an exact solution is desired, the settings above can be adjusted by going to File > Options > Formulas and changing the value in each field as desired.
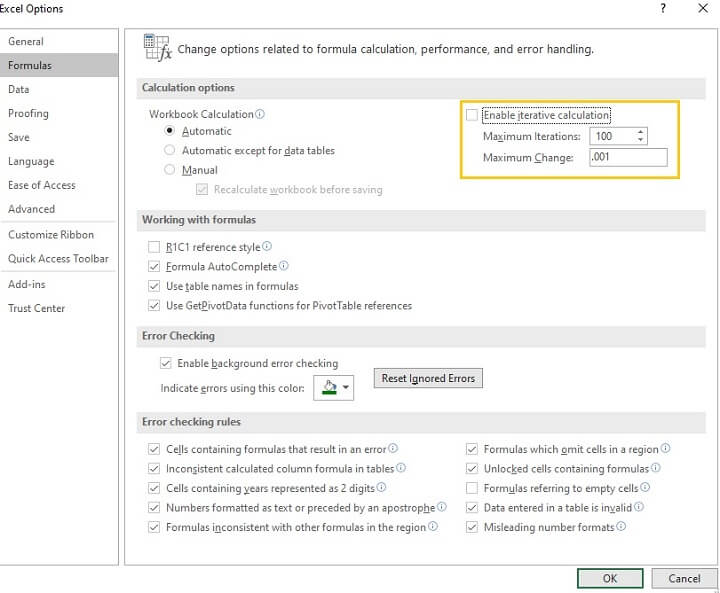
- The default number of iterations is 100. To allow Excel to attempt more possible solutions, increase the maximum number of iterations.
- The default maximum change is 0.001. To force Excel to find a more precise solution, adjust the Maximum Change to a very small number, like 0.000001. To allow a more flexible result, make the Maximum Change a larger number, perhaps closer to the number 1.
Doing the above will adjust the Goal Seek settings for the current workbook.
In the case of this example, we are flexible and will accept a value close to our original target. We can either:
- Accept the solution presented,
- Click OK and manually adjust the value on our worksheet to one that is close to the solution presented, or
- Adjust the maximum change and/or iteration.
To go with the first option, simply click OK.
To use the second option, we click OK and manually change the value in cell B6 until we achieve a satisfactory outcome in our output cell.
If we go with the third option, we can adjust the maximum change to 0.1 (meaning we will accept an answer within 10 cents of our goal). When we re-run Goal Seek, we see that a solution that is within 10 cents of our target value was found.
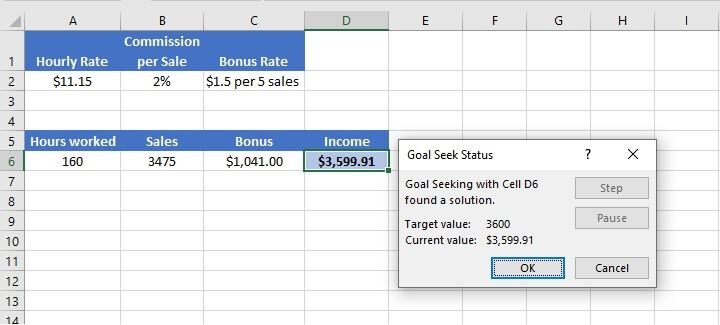 We click OK to accept, and the worksheet is updated. The number displayed looks the same, but increasing the number of decimal places shows a figure of 3474.9 sales to get within 10 cents of the target value. If we sell 3,474.9 units, our income will be $3,599.91.
Automate Goal Seek
One reason many people may not even be aware of Excel Goal Seek is its location within the Excel ribbon, and the number of steps required to see the result of a proposed change. To circumvent this, we can record a macro so that goal seeking can be accomplished with one click.
Setting up the macro will take a few steps, but once it’s done, it makes our work easier the next time we have to experiment with these numbers.
Let’s record the Goal Seek steps as a new macro.
- First, enable the Developer tab on the Excel ribbon (if it is not shown) by right-clicking on the ribbon then clicking on the “Customize the Ribbon” command.
- On the right side of the pop-up window, under Customize the Ribbon, look for the Developer checkbox and click OK.
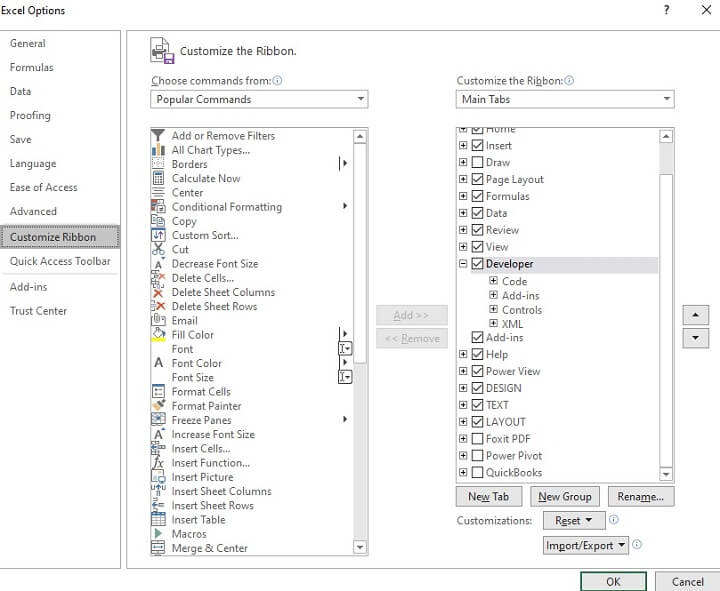 The Developer tab will now show up on your ribbon.
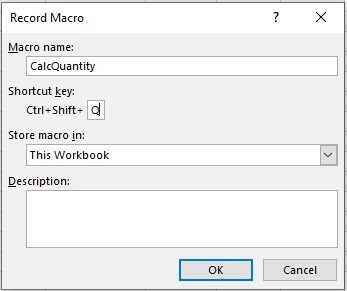
- Go to the Developer tab and select Record Macro.
- In the Record Macro window, enter a macro name. We have named ours CalcQuantity.
- Assign a shortcut key. In our example, we used Ctrl+Shift+Q, and the macro will be stored in this workbook only.
- We will perform a Goal Seek as normal. All steps from here onward will be recorded until we stop recording. We’ll set cell C7 to zero by changing C2, and click OK.
- Return to the Developer tab and Stop Recording.
- Let’s now set up an independent cell that will be used as the input value for cell C7 whenever we run the one-click version of Goal Seek in the future. In our example, we will use cell F1.
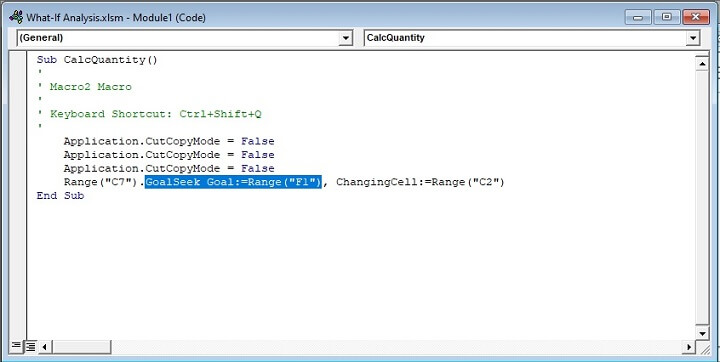
- We’ll now adjust the macro we just created by changing the zero value to whatever is entered in cell F1. Click the Visual Basic command on the Developer tab.

- Within the Module code, change GoalSeek Goal:=0 to GoalSeek Goal:=Range(“F1”).
- Save and exit Visual Basic.
 Note that your Excel file will need to be saved as a Macro-enabled workbook type in order for your macro to work.
Now we can enter any value in F1 as our target profit amount, then use the macro shortcut key to run the macro in one click. Wasn’t that cool?
Learn more
For more Goal Seek examples and how to use the Scenario Manager tool, check out our resource on what if analysis.
If you enjoyed learning about Excel Goal Seek, wait till you see what we have waiting for you in our course library. Our goal is to make you an Excel expert!
Start with the Microsoft Excel - Basic and Advanced course today to learn more about how to optimize, analyze, and present your data.