
Excel macro codes can be used to automate regular Excel tasks and prevent you from performing them manually. This results in time saved and more reliable work.
This VBA code library is a list of useful VBA codes for Excel that you can start using immediately.
These codes are perfect for beginners who have not used Excel VBA before, or are just starting out.
Let us first describe what a macro code is and how you can start using them. Then we will get to the exciting part and explore the Excel macro examples in this list.
Learn the best Excel shortcuts!
Download our printable shortcut cheatsheet for PC and Mac
What is macro code?
Macro code refers to the VBA (Visual Basic for Applications) code for the macro.
You can create macros in Excel by either recording the steps you want it to perform (the VBA is written for you), or by writing the VBA yourself.
Writing this VBA or macro code yourself gives you far greater control over your macro.
The VBA code can be simple, and perform a basic formatting step or freeze panes. Or it could do something greater such as export all sheets of a workbook as a separate PDF.
This VBA code library provides a list of macro codes for you to copy and paste to get started.
This saves you from having to create them yourself, but is also a great way to begin learning VBA.
Show the Developer tab
To use the VBA codes, you will need access to the Developer tab.
If you do not have the Developer tab on your Ribbon, follow these steps to enable it.
- Click File > Options.
- Select the Customize Ribbon category and then check the box for the Developer tab.
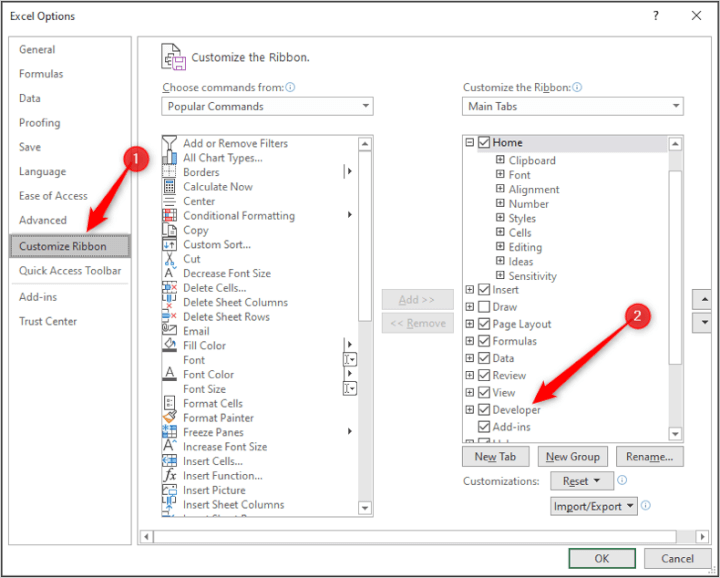
- Click Ok.
How to use the macro code
Using the macro codes require just a simple copy and paste. However, you need to ensure that you paste them to the correct place.
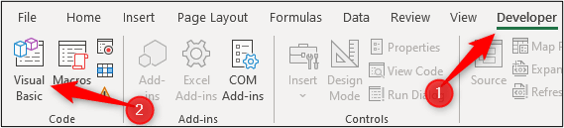
- Click Developer > Visual Basic, or press Alt + F11.
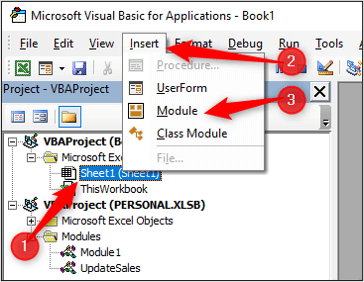
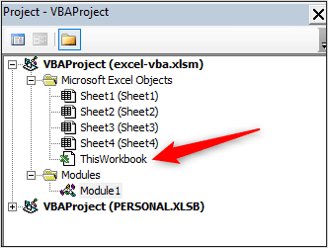
 The Visual Basic Editor opens. The Project Explorer window is shown on the left. It lists the open workbooks and other projects.
- Click within the workbook where you want to insert the VBA code, click Insert > Module.
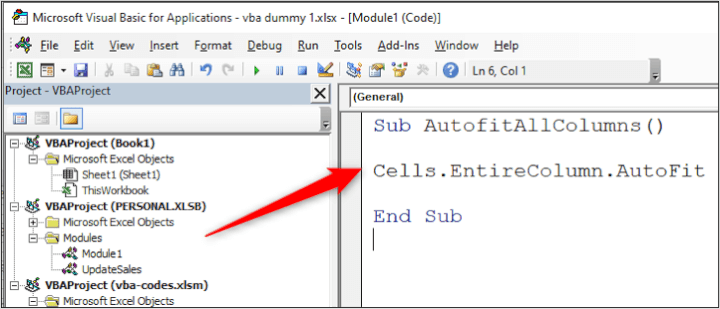
- Copy and paste the code from this article into the code window.
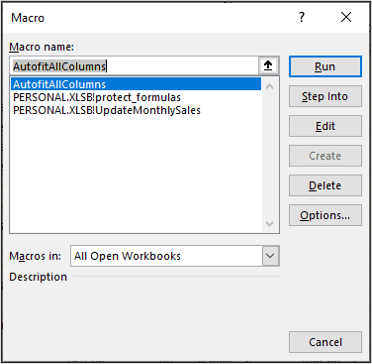
The macro will then be available to run in the Macros window.
- Click Developer > Macros. Select the macro from the list and click Run.
 In this VBA code library, there is a category named Events. These macros will not be stored in modules, but in the object where the event occurs.
This will be explained when we present the code. The majority of the macros in this list are stored in modules and follow the procedure explained above.
Adding a button to trigger your macros
Although it is possible to run the macro from the macros window. Assigning the macro to a button that you can click, will make it easier to run your macros.
You can insert buttons on the Quick Access Toolbar (where the Save and Undo buttons reside), the Ribbon, or onto a worksheet.
The approach you take depends on what the macro does, and when you want to run it.
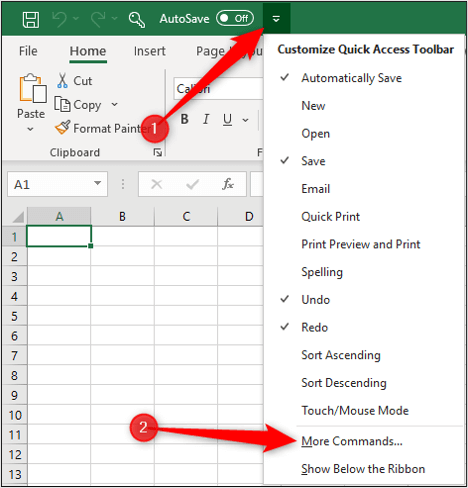
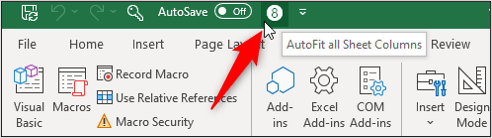
For this example, we will show you how to add a button to the Quick Access Toolbar to run your macros.
- Click the Customize Quick Access Toolbar arrow and click More Commands.
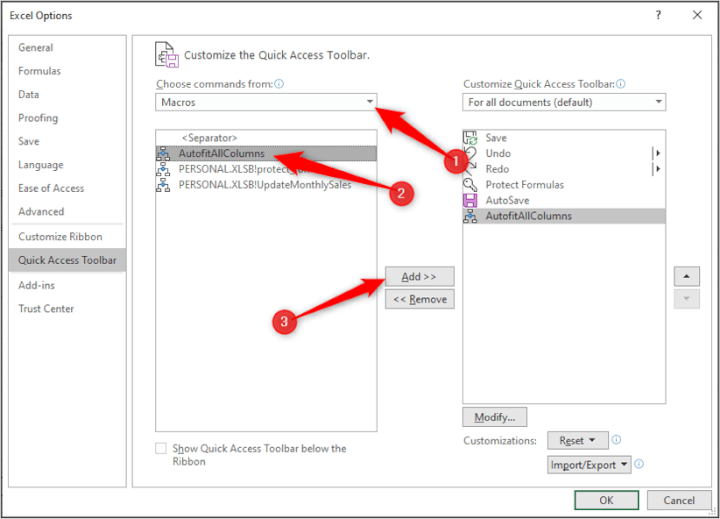
- Click the Popular Commands list arrow and select Macros. Select the macro you want and click Add.
- Click the Modify button to change the image and the display name of the button.
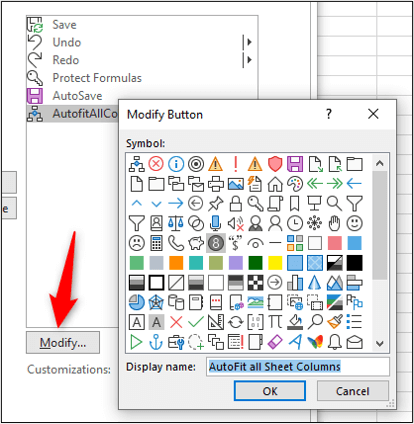 The button will appear on the Quick Access Toolbar and will run your macro when clicked.
The display name is shown as you position your mouse over the button.
Excel VBA code examples
The macro code examples in this list have been split into categories to make it easier to find those that you are interested in using.
- AutoFit column widths
- Copy and paste
- Clear all hyperlinks on a sheet
- Format cells with formulas
- Convert formulas to values
- Unhide all columns
- Protect a worksheet
- Loop through all the worksheets of a workbook
- Unhide all worksheets
- Protect a workbook
- Opening and closing a workbook
- Email the active workbook with Outlook
- Export each worksheet as a single PDF
- Export the active sheet as a PDF
- Export multiple sheets to a single PDF
- Loop through all the files of a folder
- Selecting a file with a FileDialog
- Sorting columns
- Filter your data
- Create a chart
- Go to a specific worksheet on Open
- Perform an action on Cell Change
A recap!
Common Excel tasks
These VBA codes will perform common Excel tasks quickly.
AutoFit column widths
This code will automatically fit the column widths for all the columns of the worksheet.
Sub AutofitAllColumns()

Cells.EntireColumn.AutoFit

End Sub
This code will automatically fit the widths of specific columns on a worksheet. In this example, it is columns D and F.
Sub AutofitSpecificColumns()

Range("D:D,F:F").EntireColumn.AutoFit

End Sub
Copy and paste
Copy and paste is one of the most common actions in Excel. It can be written with just one line of VBA code.
The following code copies range A1:B6 into A1 of another worksheet.
Sub CopyAndPaste()

Range("A1:B6").Copy Worksheets("Sheet2").Range("A1")

End Sub
You may not have a specific range to paste the content into. Often you are trying to append the copied data to the bottom of another list.
This code copies the used range around cell A2 and pastes it to the first empty cell at the bottom of column A on a sheet named Archive.
Sub CopyAndPaste()

Range("A2").CurrentRegion.Copy Worksheets("Archive").Range("A1").End(xlDown).Offset(1, 0)

End Sub
Finally, you may want to use some of the paste special options available in Excel. To access these in VBA, we will separate the copy and paste operation into two statements.
This code uses the PasteSpecial method to paste the values only.
Sub CopyAndPasteValues()

Range("A1:B6").Copy
Worksheets("Sheet2").Range("A1").PasteSpecial Paste:=xlPasteValues

End Sub
Clear all hyperlinks on a sheet
The following macro code will clear all the hyperlinks on a worksheet.
Sub ClearHyperlinks()

ActiveSheet.Hyperlinks.Delete

End Sub
Format cells with formulas
Formatting cells that contain formulas makes them easy to identify on a worksheet. This macro code will format the formula cells with a yellow fill color (ColorIndex = 6).
It declares a range variable named rng and uses it to loop through each cell that contains a formula.
Sub FormatFormulas()

Dim rng As Range

For Each rng In Cells.SpecialCells(xlCellTypeFormulas)

rng.Interior.ColorIndex = 6

Next rng

End Sub
Convert formulas to values
Another common action with formulas is to convert them into values. This VBA code will do this for all formulas on the worksheet.
Sub ConvertFormulastoValues()

Dim rng As Range

For Each rng In Cells.SpecialCells(xlCellTypeFormulas)

rng.Formula = rng.Value

Next rng

End Sub
Worksheet codes
These codes will perform some typical worksheet tasks.
Unhide all columns
Hiding columns is great for reducing worksheet clutter and protecting data. This macro code will unhide all the hidden columns with the click of a button.
Sub UnhideAllColumns()

Columns.EntireColumn.Hidden = False

End Sub
Protect a worksheet
The following code will protect the active sheet.
Sub ProtectWS()

ActiveSheet.Protect

End Sub
You may want to take this further and assign a password or specify actions to be allowed. This macros code assigns the password Excel and allows the inserting of rows only.
If you know worksheet protection well, you will know that there are various actions that you can allow or prevent. And we can do this with our VBA code.
Sub ProtectWS()

ActiveSheet.Protect Password:=”Excel”, AllowInsertingRows:=True

End Sub
A common reason to protect a worksheet is to save your formulas from accidental damage. This code will protect only cells on a worksheet that contains formulas.
It begins by unprotecting the sheet and unlocking all cells. It then locks those containing formulas before applying protection.
Sub ProtectFormulas()

With ActiveSheet

.Unprotect
.Cells.Locked = False
.Cells.SpecialCells(xlCellTypeFormulas).Locked = True
.Protect

End With

End Sub
Loop through all the worksheets of a workbook
It is simple to set up a loop to perform an action to all the worksheets of a workbook. You can insert any action you require.
In this example, we protect the worksheets. Replace the line ws.Protect with the actions that you require. Use the variable ws when referencing the worksheet.
Sub LoopAllSheets()

Dim ws As Worksheet

For Each ws In ActiveWorkbook.Worksheets
ws.Protect
Next ws

End Sub
Workbook codes
The following codes will perform some common workbook tasks.
Unhide all worksheets
In Excel, you can only unhide one worksheet at a time. So, this code will unhide all the worksheets with one click.
Sub UnhideAllWorksheets()

Dim ws As Worksheet

For Each ws In ActiveWorkbook.Worksheets
ws.Visible = xlSheetVisible
Next ws

End Sub
Protect a workbook
The following code will protect a workbook to prevent structure changes. It sets a password, but this is optional and can be excluded.
Sub ProtectWorkbook()

ThisWorkbook.Protect Password:="Excel"

End Sub
Opening and closing a workbook
The following code follows a procedure to copy data from the currently active workbook to a workbook named North.
It assigns the active workbook to a variable, then opens the North workbook to copy data from range A1:C250 into it. This workbook is then saved and closed.
There are many techniques to reference workbooks and a few are demonstrated in this small code.
Sub OpenCloseWorkbooks()

Dim wbk As Workbook
Set wbk = ActiveWorkbook

Workbooks.Open "C:\Users\Admin\OneDrive\Desktop\Sales\North.xlsx"
wbk.Sheets("Sheet1").Range("A1:C250").Copy Destination:=Range("A1")

ActiveWorkbook.Close SaveChanges:=True

End Sub
Email the active workbook with Outlook
The following VBA code creates a new email in Microsoft Outlook with the recipient's email, subject line, and the body text all populated. The active workbook is added as an attachment.
The email is displayed so that the email can be checked and changes made before sending. Change .display to .send to email the attached workbook with one click.
Sub AttachToEmail()

Dim OutApp As Object
Dim OutMail As Object
Set OutApp = CreateObject("Outlook.Application")
Set OutMail = OutApp.CreateItem(0)

With OutMail
.to = "admin@computergaga.com"
.Subject = "A Fabulous Spreadsheet"
.Body = "Hello, I hope you enjoy the fabulous spreadsheet that is attached to this email."
.Attachments.Add ActiveWorkbook.FullName
.display
End With

Set OutMail = Nothing
Set OutApp = Nothing

End Sub
Files and folders
Using VBA to automate working with files and folders during a process is very helpful.
Export each worksheet as a single PDF
This code exports all the worksheets as a separate PDF. The sheet name is used as the PDF file name, and they are saved to the folder that is assigned to the FolderPath variable. Simply change this path to what you need.
Sub ExportAsPDF()

Dim FolderPath As String
Dim ws As Worksheet

FolderPath = "C:\Users\Computergaga\Desktop\Sales"

For Each ws In ActiveWorkbook.Worksheets

ws.ExportAsFixedFormat Type:=xlTypePDF, Filename:=FolderPath & "\" &
ws.Name, openafterpublish:=False

Next

MsgBox "All PDF's have been successfully exported."

End Sub
Export the active sheet as a PDF
If you only need to export the active worksheet, then only the following few lines of code are required.
Sub ExportAsPDF()

FolderPath = "C:\Users\Computergaga\Desktop\Sales"

ActiveSheet.ExportAsFixedFormat Type:=xlTypePDF, Filename:=FolderPath & "\" &
Activesheet.Name, openafterpublish:=False

End Sub
Export multiple sheets to a single PDF
You may want to export the worksheets into a single PDF. This code exports the worksheets named London and Berlin into one PDF file.
The sheets are referenced by their name in this example, but you can also reference them using their index number. For example, Sheets(Array(3, 6)).Select
Sub ExportAsPDF()

Dim FolderPath As String

FolderPath = "C:\Users\Trainee1\Desktop\PDFs"

Sheets(Array("London", "Berlin")).Select
ActiveSheet.ExportAsFixedFormat Type:=xlTypePDF, Filename:=FolderPath & "\Sales", openafterpublish:=False, ignoreprintareas:=False

MsgBox "All PDF's have been successfully exported."

End Sub
Loop through all the files of a folder
The following VBA code will loop through each file in a folder, the Sales folder on the desktop.
Each file is opened, the number 20 entered into cell A1 of Sheet1 then saved and closed. This is a simple operation, but this code can be replaced with whatever actions you want to perform on each file in the folder.
The Dir function is used for this process. The first instance of Dir is when the file path is provided. It grabs the filename of the first file in the folder.
It is then used again at the end of the loop to grab the name of the next file.
Sub LoopAllFiles()

Dim fileName As Variant
fileName = Dir("C:\Users\admin\OneDrive\Desktop\Sales\")

Do While fileName <> ""

    Workbooks.Open fileName
    Worksheets("Sheet1").Range("A1").Value = 20
    ActiveWorkbook.Close savechanges:=True

    fileName = Dir

Loop

End Sub
You can loop through specific files only by using wildcards. The code below can be used to replace the first instance of the Dir function and loop through .xlsx files only.
fileName = Dir("C:\Users\admin\OneDrive\Desktop\Sales\*.xlsx")Selecting a file with a FileDialog
When interacting with files, the FileDialogs in Excel VBA are very useful. They are an environment that the user is instantly familiar with.
There are FileDialogs for the file open, save, picker, and a folder picker. In this example, the open dialog is used. This is known as msoFileDialogOpen.
Now, this is a little misleading, because the dialog will not actually open the file. It only provides the environment to locate and select it easily. You can then do whatever actions you want to it.
In this VBA code, different properties of the FileDialog are manipulated so it is used with the With construct.
The selected workbook is opened and the number 20 written into cell A1. Once again a sample action that you can replace with whatever you want.
Sub UsingFileDialog()

Dim Filename As String

With Application.FileDialog(msoFileDialogOpen)
.AllowMultiSelect = False
.Title = "Select a workbook to use"
.Show
Filename = .SelectedItems(1)
End With

Workbooks.Open Filename
Worksheets("Sheet1").Range("A1").Value = 20
ActiveWorkbook.Close SaveChanges:=True

MsgBox "Workbook updated"

End Sub
Useful Excel features
These VBA codes will simplify the use of some of the most useful features of Excel.
Sorting columns
The following code sorts range A1:K250 by a single column. It assumes that the range has headers in the first row.
The Key1 argument specifies the column to sort by. In this example, the argument is set to C1, so the range is sorted by column C in descending order.
Sub SortSingleColumn()

Range("A1:K250").Sort Key1:=Range("C1"), Order1:=xlDescending

End Sub
In the following macro code, the defined name of Sales is used as the range to sort by. The defined name does not include the headers.
This time the range is sorted by column B in ascending order.
Sub SortSingleColumn()

Range("Sales").Sort Key1:=Range("B1"), Order1:=xlAscending

End Sub
Extra Key and Order arguments can be added to sort by multiple columns.
In this example, the defined name Sales was used as the range. The range is sorted by column D first in ascending order, and then by column J in descending order.
Sub SortMultipleColumns()

Range("Sales").Sort Key1:=Range("D1"), Order1:=xlAscending, Key2:=Range("J1"), Order2:=xlDescending

End Sub
Finally, if your data is formatted as a table, the following VBA code can be used.
In this example, the table is named Sales and the table is sorted by the Country field in ascending order.
Sub SortTable()

With ActiveSheet.ListObjects("Sales").Sort
   .SortFields.Clear
   .SortFields.Add Key:=Range("Sales[Country]"), Order:=xlAscending
   .Apply
End With

End Sub
Filter your data
The following macro code can be used to turn on the AutoFilter feature. It applies to the active worksheet and uses the current region for range A1.
Sub TurnFilterOn()

Range("A1").AutoFilter

End Sub
To turn the AutoFilter feature off, you can use this code.
Sub TurnFilterOff()

ActiveSheet.AutoFilterMode = False

End Sub
In this example, a filter is applied to column D (Field:=4) to show the records for Denmark only.
Sub FilterByText()
Range("A1").AutoFilter Field:=4, Criteria1:="Denmark"
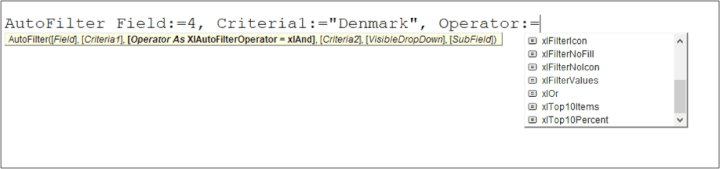
End SubTo filter by more than one text value, the xlOr operator can be used. Here, the data is filtered to show the rows for Denmark and the UK.
Sub FilterByText()

Range("A1").AutoFilter Field:=4, Criteria1:="Denmark", Operator:=xlOr, Criteria2:="UK"

End Sub
There are plenty of operators available for use such as xlFilterIcon and xlTop10Items.
To filter with numbers, ensure you enter the logical operators into the criteria string. The code below filters column H to only show rows where the number is greater than 5 and less than 20.
Sub FilterByNumber()

Range("A1").AutoFilter Field:=8, Criteria1:=">5", Operator:=xlAnd, Criteria2:="<20"

End Sub
The following example filters the list by multiple columns. It filters column D for Denmark only and column H for numbers greater than 5 and less than 20.
Sub FilterByTwoColumns()

With Range("A1")

.AutoFilter Field:=4, Criteria1:="Denmark"
.AutoFilter Field:=8, Criteria1:=">5", Operator:=xlAnd, Criteria2:="<20"

End With

End Sub
To clear any applied filters and show all data, use the following code. This code checks if any filters have been applied first, and if so, clears them to show all the data.
Sub ClearFilters()

If ActiveSheet.FilterMode = True Then

ActiveSheet.ShowAllData

End If

End Sub
The AutoFilter is not the only filter in Excel. Learn how to use the Advanced Filter with VBA in Excel.
Create a chart
You can use Excel VBA to create charts at the click of a button.
This VBA code will create a column chart (default chart type) from range C3:D8. It uses the chart object variable, so parameters are set for the chart area size and position. Data is then set for the chart.
Sub CreateChart()

Dim MChart As ChartObject

Set MyChart = ActiveSheet.ChartObjects.Add(Top:=50, Left:=100, Width:=450, Height:=250)
MyChart.Chart.SetSourceData Range("C3:D8")

End Sub
You may want to use a different type of chart, so this code will change the chart to a line chart. A list of all chart types will appear as you type.
Sub ChangeChartType()

Dim MyChart As Chart
Set MyChart = ActiveSheet.ChartObjects(1).Chart

MyChart.Chart.ChartType = xlLine

End Sub
Finally, you might want to add or remove chart elements. This code adds a chart title and also data labels.
When using the SetElement method, a list of chart elements will appear. It is important that you choose one to work with your type of chart. The msoElementDataLabelOutSideEnd used in this example works with column charts, but not line charts so it would produce an error.
Sub EditChartElements()

Dim MyChart As Chart
Set MyChart = ActiveSheet.ChartObjects(1).Chart

MyChart.HasTitle = True
MyChart.ChartTitle.Text = "Product Sales"
MyChart.SetElement msoElementDataLabelOutSideEnd

End Sub
The code here is a start guide to give you the foundation to work off of. It is sure to require some minor editing to work for your spreadsheets.
Events
These macro codes are run when events are triggered as someone uses Excel. These events can include changing cell values, opening Excel workbooks, and changing sheet tabs.
They do not require the user to consciously click a button to run the macro. They occur naturally as and when the specified event happens.
Go to a specific worksheet on Open
This VBA code example will occur automatically when the Excel workbook is opened. For this to happen, we need to use the Workbook Open procedure.
- In the Visual Basic Editor, double click the workbook object from the Project Explorer window that you want to use the code with.
- Select Workbook from the Object list.
- Select Open from the Procedure list.
- Paste the required code in the procedure which is shown in the Code window.
 For this code to be activated when the workbook is opened, do not edit the procedure name.
You can use any code you want here. In this example, you are automatically taken to a sheet named Table of Contents and cell A2.
Private Sub Workbook_Open()

Worksheets("Table of Contents").Select
Range("A2").Select

End Sub
There are many other workbook events including BeforeSave, NewSheet, and SheetActivate. These events can be very useful when automating processes such as validating data entry, setting print settings and so on.
Perform an action on Cell Change
The Change event is found on the Worksheet object. It is very useful as it is triggered when a cell value is changed.
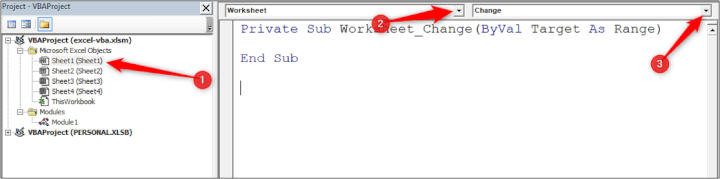
To create the Worksheet_Change procedure:
- Double click the worksheet you want to use in the Project Explorer window to open its code window.
- Select Worksheet from the Object list, Change from the Procedure list and the procedure will appear in the Code window.
 In this code, the changed cell is tested with an If statement to check if the changed cell was in column 5, and if the result of the change was the value Yes.
The variable Target is provided by the worksheet change event. This is the changed cell.
If these conditions are met, the row contents are copied to the bottom of the list on sheet 2 and the cell fill changes to a yellow color.
The Application.EnableEvents statement is used as best practice because the procedures actions can trigger another change event whilst this one is still running.
In this example, it is unnecessary but I wanted to provide it with the code to protect the actions you set from producing errors.
Private Sub Worksheet_Change(ByVal Target As Range)

If Target.Column = 5 And Target = "Yes" Then

Application.EnableEvents = False
Target.EntireRow.Copy Worksheets("Sheet2").Range("A1").End(xlDown).Offset(1, 0)
Target.Interior.ColorIndex = 6

End If

Application.EnableEvents = True

End Sub
What next?
These VBA codes are a great time-saver, but it is just the beginning. There's a world to explore for functions VBA range object and more! You should learn Excel VBA to take advantage of its potential in improving your Excel productivity.
Enroll in our Excel Macros and VBA course to start your journey today.