
Excel VBA (Visual Basic for Applications) is a powerful tool for automating repetitive tasks in Excel. Whether you're trying to master Excel basics, or If you work with large amounts of data, you'll quickly realize that it's impossible to do everything manually. That's where loops come in.
Loops are an essential technique to learn in Excel VBA as they allow lines of code to be repeated a set number of times, forcing the program to perform the same task multiple times.
In this blog post, we'll dive into the two main types of loops in Excel VBA: For Loops and Do Loops. We'll explore how to use them and provide examples to illustrate their usefulness. Once you've learned how to use loops, you'll be able to automate complex tasks and save valuable time.
What is an Excel VBA loop?
Loops are more advanced but a fundamental technique in any Excel VBA code. Loops force lines of code to be repeated a set number of times. You’ll want to repeat lines when you want to perform a similar task multiple times.
Not to go into too much detail about the Excel VBA object model, but each type of object is in a hierarchy, like each person in an organisational structure of a company.
In the Excel VBA object model, you can have multiple cells in a worksheet, multiple worksheets in a workbook, a workbook in multiple open workbooks and many more.
For example, you can loop through or go through all the worksheets in a workbook and perform a certain task to them like colour the 1st row blue and make the title font in Range(“A1”) bold.
To perform the same task to each worksheet without a loop, would mean having to run the code each time for each worksheet. Using loops, provides the ability to loop through each worksheet so the code doesn’t need to be run separately each time.
Different types of Excel VBA Loops
There are two main types of loops:
- For Loops
- Do Loops
For Loops
An Excel VBA For Loop allows you to run a block of code within the loop a set number of times.
There are two main types of For Loops:
- For Next Loop
- For Each Loop
A For Next Loop runs a block of code a set number of times. A For Each loop goes through every object, regardless of how many objects there are.
For example, if there are 50 worksheets in a workbook, a For Next Loop could loop through any number of worksheets in the workbook, from 2 up to all 50 worksheets.
However a For Each Loop would automatically loop through all 50 worksheets, so there wouldn’t be an option to pick how many worksheets to loop through.
The full code structure or syntax of a For Next Loop is below:
Sub ForNextLoop()

    Dim i As Long

    For i = 1 To 10 Step 2
        worksheets(i).activate
    Next i

End Sub
Typically, a variable is declared that holds a reference to a number that will be used as a counter in the VBA For Loop. In this example, i is the counter and the line of code between the For statement and the Next statement runs 10 times, from 1 to 10.
The Step keyword indicates the interval for the number of times the loop will run. In this example, Step 2 means the loop runs 5 times and activates worksheets 1,3,5,7 and 9, if there were 10 worksheets in the workbook.
Bonus tip: I recommend using F8 to step through the code line by line. To do this, click the cursor on the 1st line of code, and press F8 to run each line separately. The line of code will turn yellow which shows it will be the next line to run.
 Minimise the code window once the worksheets(i).activate statement has been run, to see which worksheet has been activated, in each iteration of the loop.
The full code structure of a VBA For Each Loop is below:
Sub ForEachLoop()

    Dim ws As Worksheet

    For Each ws In ThisWorkbook.Worksheets
        ws.Activate
    Next ws

End Sub
In this example, a variable has been declared that holds a reference to a worksheet using the Dim ws As Worksheet statement. It loops through every worksheet in ThisWorkbook (which is the workbook that the code is in) and activates each one in turn, until it's gone through every worksheet in the workbook.
Similar to the For Next Loop, use F8 to step through the code line by line to see the loop working. It will make it much easier to understand what’s going on and how loops work.
Do Loops
Whereas using for Loop VBA repeats a block of code a set number of times, a Do Loop repeats the block of code between the Do statement and Loop statement an indefinite amount of times, until a condition is satisfied.
There are two main types of Do Loops:
- Do While Loop
- Do Until Loop
The two are similar but there’s a subtle difference.
An Excel VBA While Loop runs while the condition is true whereas a Do Until Loop runs until the condition becomes true.
An example of the code structure of a Do While Loop using while Loop VBA is below:
Sub DoWhileLoop()

    Dim i As Long

    Do While i < 10
        i = i + 1
        Debug.Print i
    Loop
End Sub
This prints out the numbers 1 to 10 in the Immediate Window. As soon as i becomes 11, the condition i<10 is no longer satisfied and the VBA While Loop ends.
Let’s compare that to a VBA Do Until loop using do until loop vba below:
Sub DoUntilLoop()

    Dim i As Long

    Do Until i < 10
        i = i + 1
        Debug.Print i
    Loop
End Sub
The loop never gets started because the 1st statement Do Until i < 10 is already satisfied because i = 0, so it skips to the end of the loop without getting to the i= i + 1 statement.
This highlights the attention to detail required to make sure that the correct syntax is used and the loop is structured correctly. The less than sign < needs to be changed to a greater than sign > to get the Do Until loop to work.
Sub DoUntilLoop()

    Dim i As Long

    Do Until i > 10
        i = i + 1
        Debug.Print i
    Loop
End Sub
In this example, it will print out the numbers 1 to 11 in the Immediate Window.
When i becomes 10, it gets to the line Do Until i > 10 and the condition still won’t be satisfied, because at that point, i is not greater than 10. i becomes 11 and gets to the line Do Until i > 10. At that point, i is 11, so i is greater than 10, the condition is satisfied and the loop ends.
It is possible to move the While keyword and Until keyword statement to the loop line, which changes the loop structure very slightly.
I tend to use For Loops more than Do Loops. For Loops are easier to control and provide more flexibility in their structure than Do Loops.
Multiple Loops
It is possible to have multiple loops running at the same time. These are called nested loops where loops run inside one another.
For example, you can have a loop that goes through each cell in a worksheet. A loop that repeats the process for each of those worksheets in a workbook and finally a loop that repeats the going through cells process in each worksheet in every open workbook.
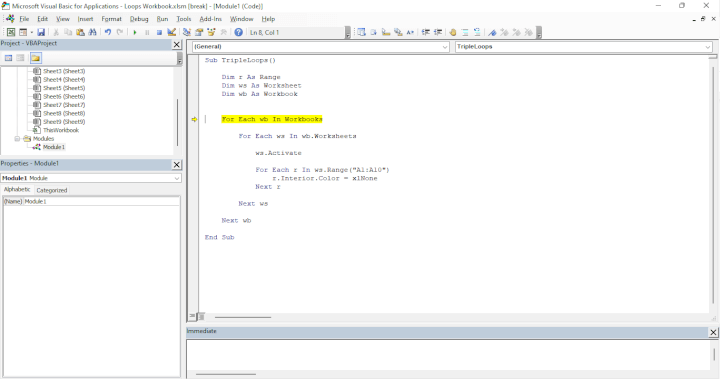
Please see the code below for an example of nested loops.
Sub TripleLoops()

    Dim r As Range
    Dim ws As Worksheet
    Dim wb As Workbook


    For Each wb In Workbooks

        For Each ws In wb.Worksheets

            ws.Activate

            For Each r In ws.Range("A1:A10")
                r.Interior.Color = vbRed
            Next r

        Next ws

    Next wb

End Sub
Three variables are declared. r which holds a reference to a cell in a worksheet. ws which holds a reference to a worksheet and wb which holds a reference to a workbook.
The code always starts from the outer loop and moves to the inner loops once it's finished processing each object in the outer loop.
In this example, the code goes through every open workbook, every worksheet in each of those workbooks, activates each worksheet and goes through Range(“A1:A10”), cell by cell, starting at Range(“A1”) and finishing at Range(“A10”). It colours each cell red until it gets to the end at Range(“A10”).
Bonus tip: When there are nested loops, it's important to indent the code for the different loops. It makes the code much easier to read and to see the block of code included in each loop.
Wrapping it up
In conclusion, Excel VBA Loops are a powerful tool to automate repetitive tasks. They allow you to repeat a block of code a set number of times or indefinitely until a condition is satisfied. There are two main types of loops, particularly in advanced VBA tasks: For Loops and Do Loops. For Loops include For Next and For Each Loops, which allow you to loop through a set of objects.
On the other hand, Do Loops include Do While and Do Until Loops, which allow you to loop indefinitely until a condition is met. Using loops can significantly reduce the time and effort required to perform complex tasks in Excel VBA. VBA range object is one of the main ways to refer to ranges in Excel VBA.
If you want to brush up your data analysis skills and learn about Microsoft Excel, GoSkills has a library of Excel courses to make upskilling easy and effective.